

Vincent Kompany's new look Burnley
Burnley like you've never seen them before

The Sky Bet Championship 2022/23 season commenced on Friday night with Huddersfield hosting Burnley. Both Clubs were operating under new Head Coaches, with Vincent Kompany taking the reins at Turf Moor.
Having worked in the Belgian Pro League for the last couple of seasons, I’ve seen a fair bit of Kompany’s work with Anderlecht and was always been impressed with their style of play, and their positional game which was no doubt Pep Guardiola influenced by in some form.
So, when Kompany was announced as the man to succeed Sean Dyche permanently, I was somewhat surprised. The phrase “chalk and cheese” comes to mind. I found Burnley hard to watch under Dyche, but Kompany is going to be a very refreshing departure from the football Burnley fans have seen in recent years.
Kompany has been backed with young, energetic talent to go alongside his high octane level of football and it promises to be an interesting season for the Clarets. Scott Twine, Taylor Harwood-Bellis, Josh Cullen amongst others have been brought into the East Lancs revolution.
Below I have analysed Burnley’s
Build up
Progression
Penetrative movement
Pressing
It must be said that Huddersfield are in some form of turmoil; losing Carlos Corberan, Harry Toffolo and Lewis O’Brien over the Summer, but this KompanyBall display was exciting nonetheless.
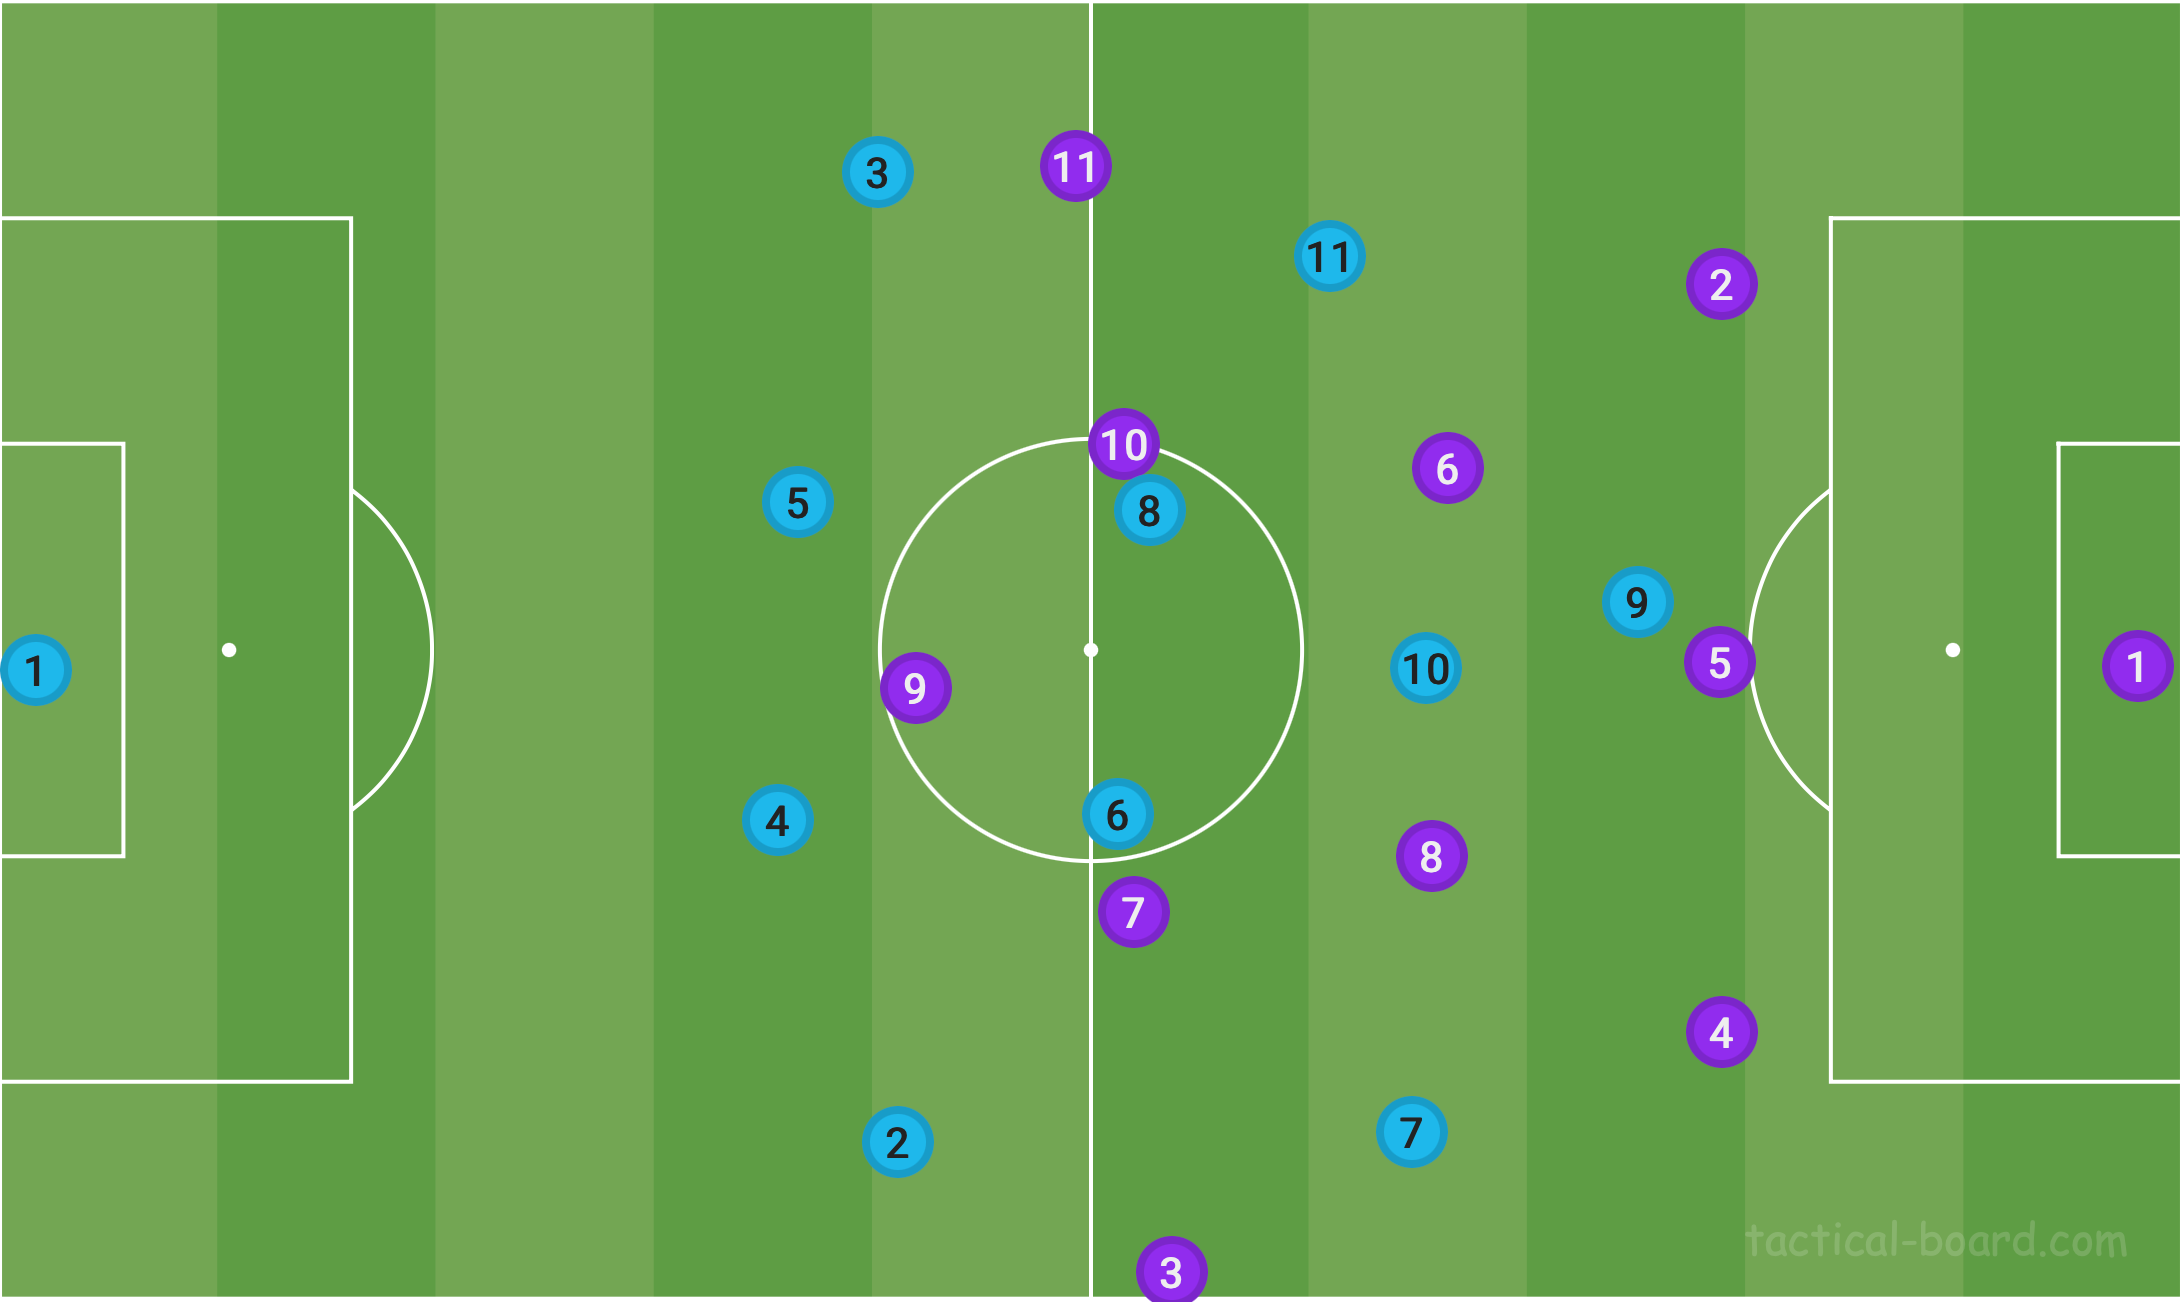
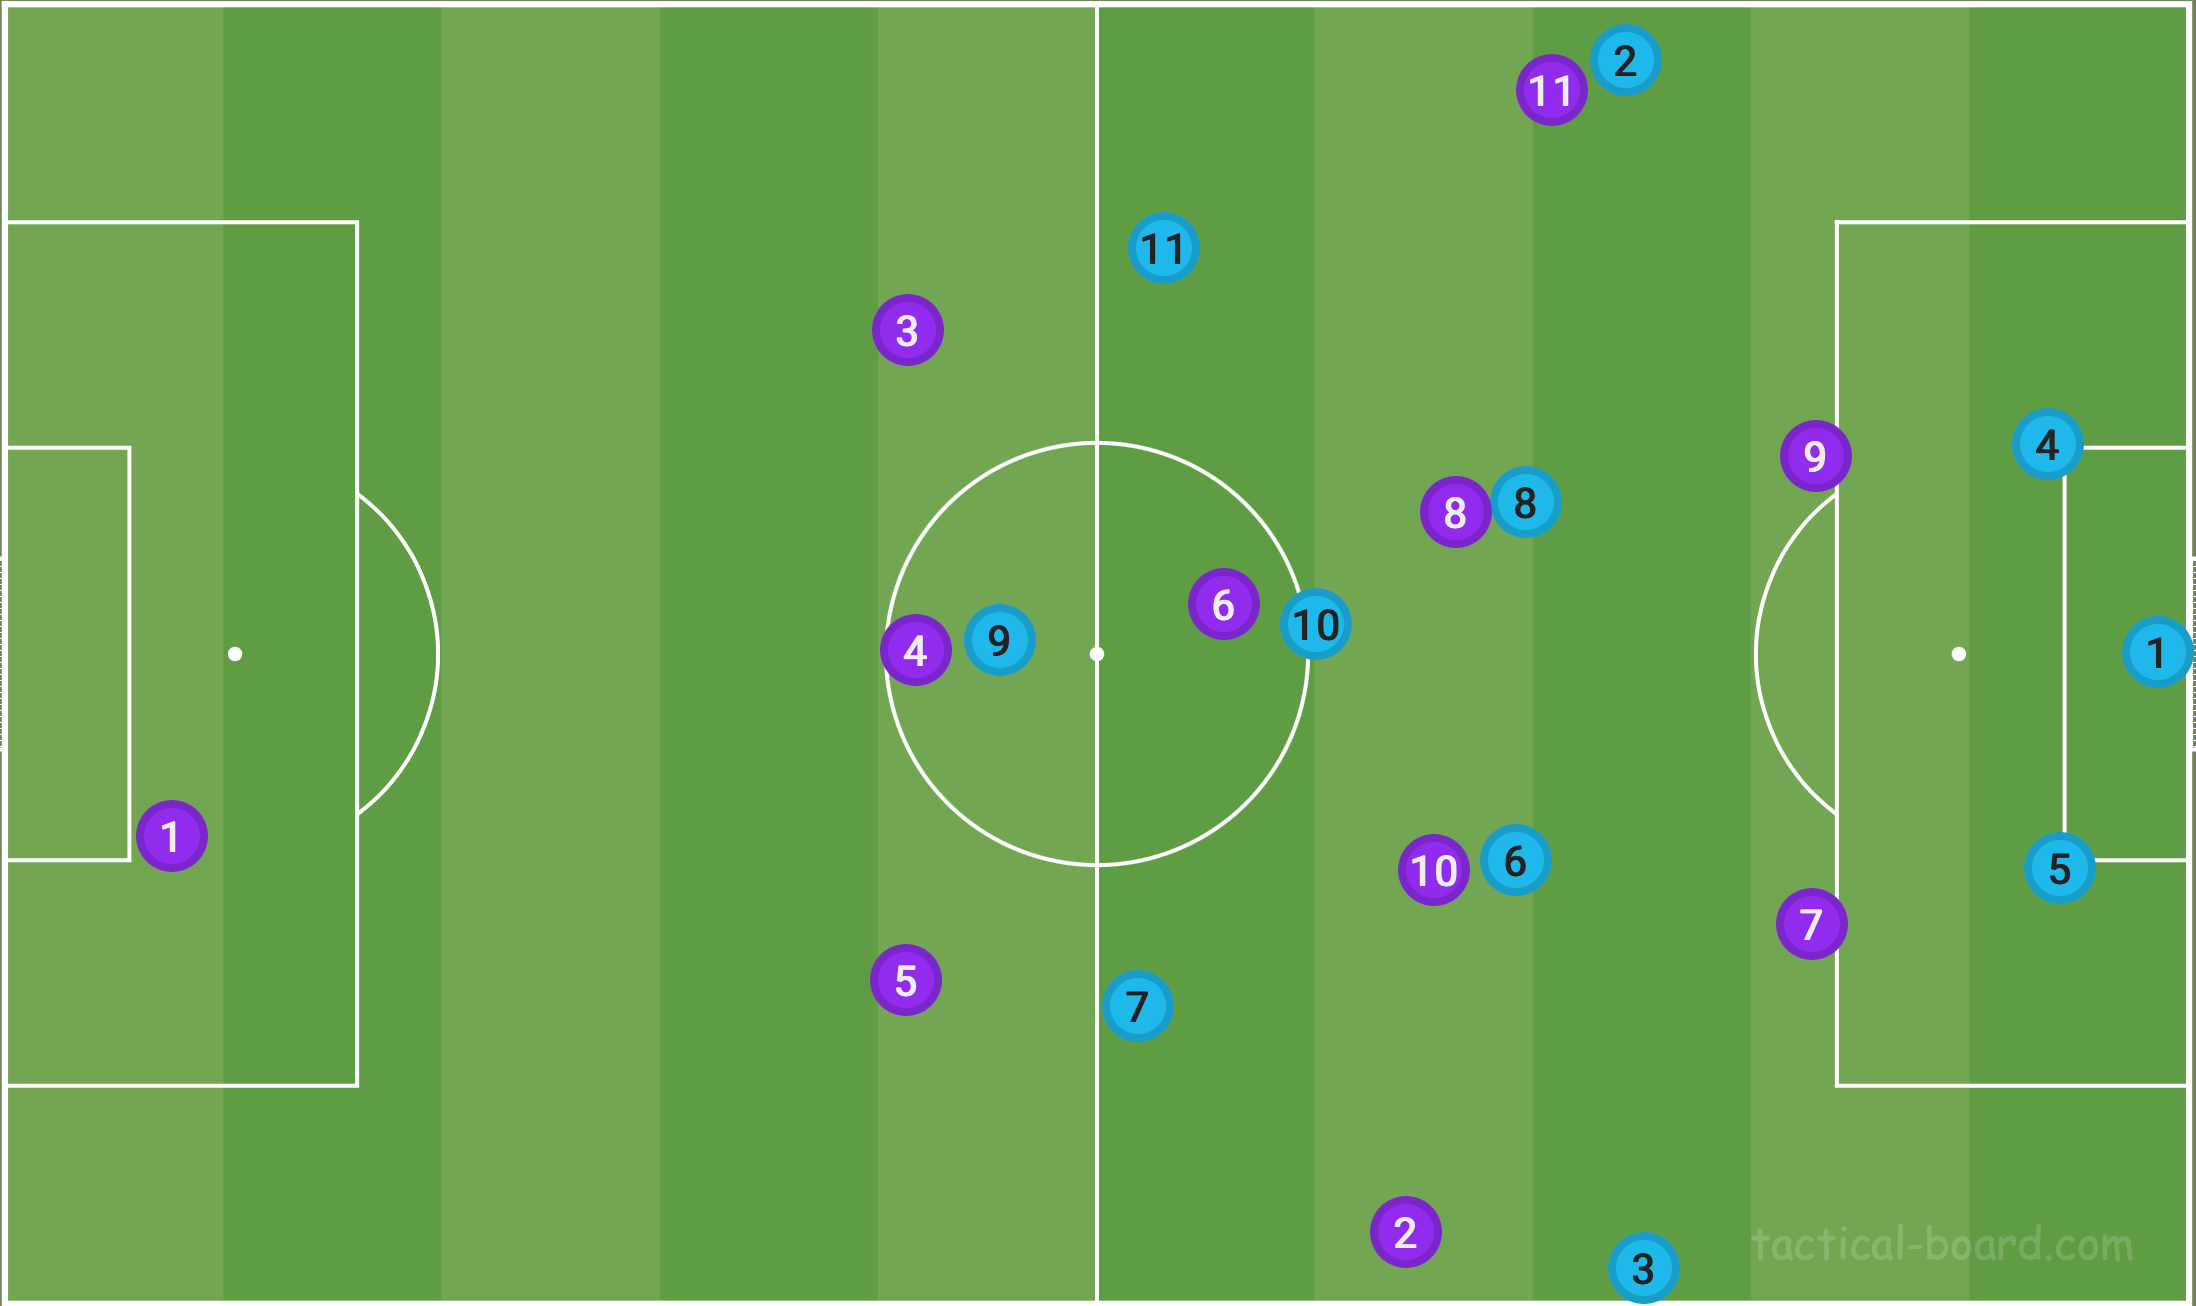
Firstly a look at how both teams “lined up” but below that is how the shapes looked in reality. Burnley’s 4-1-4-1 quickly become a 3-6-1 “box” in possession, an early example of Kompany’s tactical flexibility.

In practice the match up looked more like below.
Burnley became a 3-6-1 with RB (Connor Roberts) inverting into a Back 3, LB (Ian Maatsen) moving into a LWB role and RW (Dara Costelloe) providing width on the Right. LW (Samuel Bastien) essentially acted as a Left Sided #10.
This immediately provided a nice balance for Burnley. 2 players providing complete width (Costelloe, Maatsen), a positional Back 3, and a box midfield (Cork, Cullen, Brownhill, Bastien). The box midfield completely overran Huddersfield’s midfield 3, which was often just a flat 2 after Duane Holmes (#10) made failed higher pressures.
1. Build Up.
Burnley generally started possession with a narrow “3-2” build up.
GK, Aro Muric, would sometimes step into the first line in between CBs to create the 3, but it was mainly RB (Connor Roberts) who moved into a RCB position to make the back 3.
Burnley’s aim was to play short passes, in deep areas, to attract the pressure of Huddersfield’s front 4 (LW, RW, #10, #9). After attracting the pressure, Burnley played through or over it. They have gifted in-possession players in Harwood-Bellis, Muric and Cullen in the build-up who were tasked with making risky progressions.
The key was creating the numerical advantage in the first phase (5v4 or 5v3).
Burnley kept their wide players very wide to stretch Huddersfield’s pressure as much as possible, and they kept the #10s (Bastien, Brownhill) as high as possible too. This was to cause Huddersfield’s double pivot a positional dilemma - do they press forward or do they man orientate with Burnley’s #10s? Below is the build-up in practice.
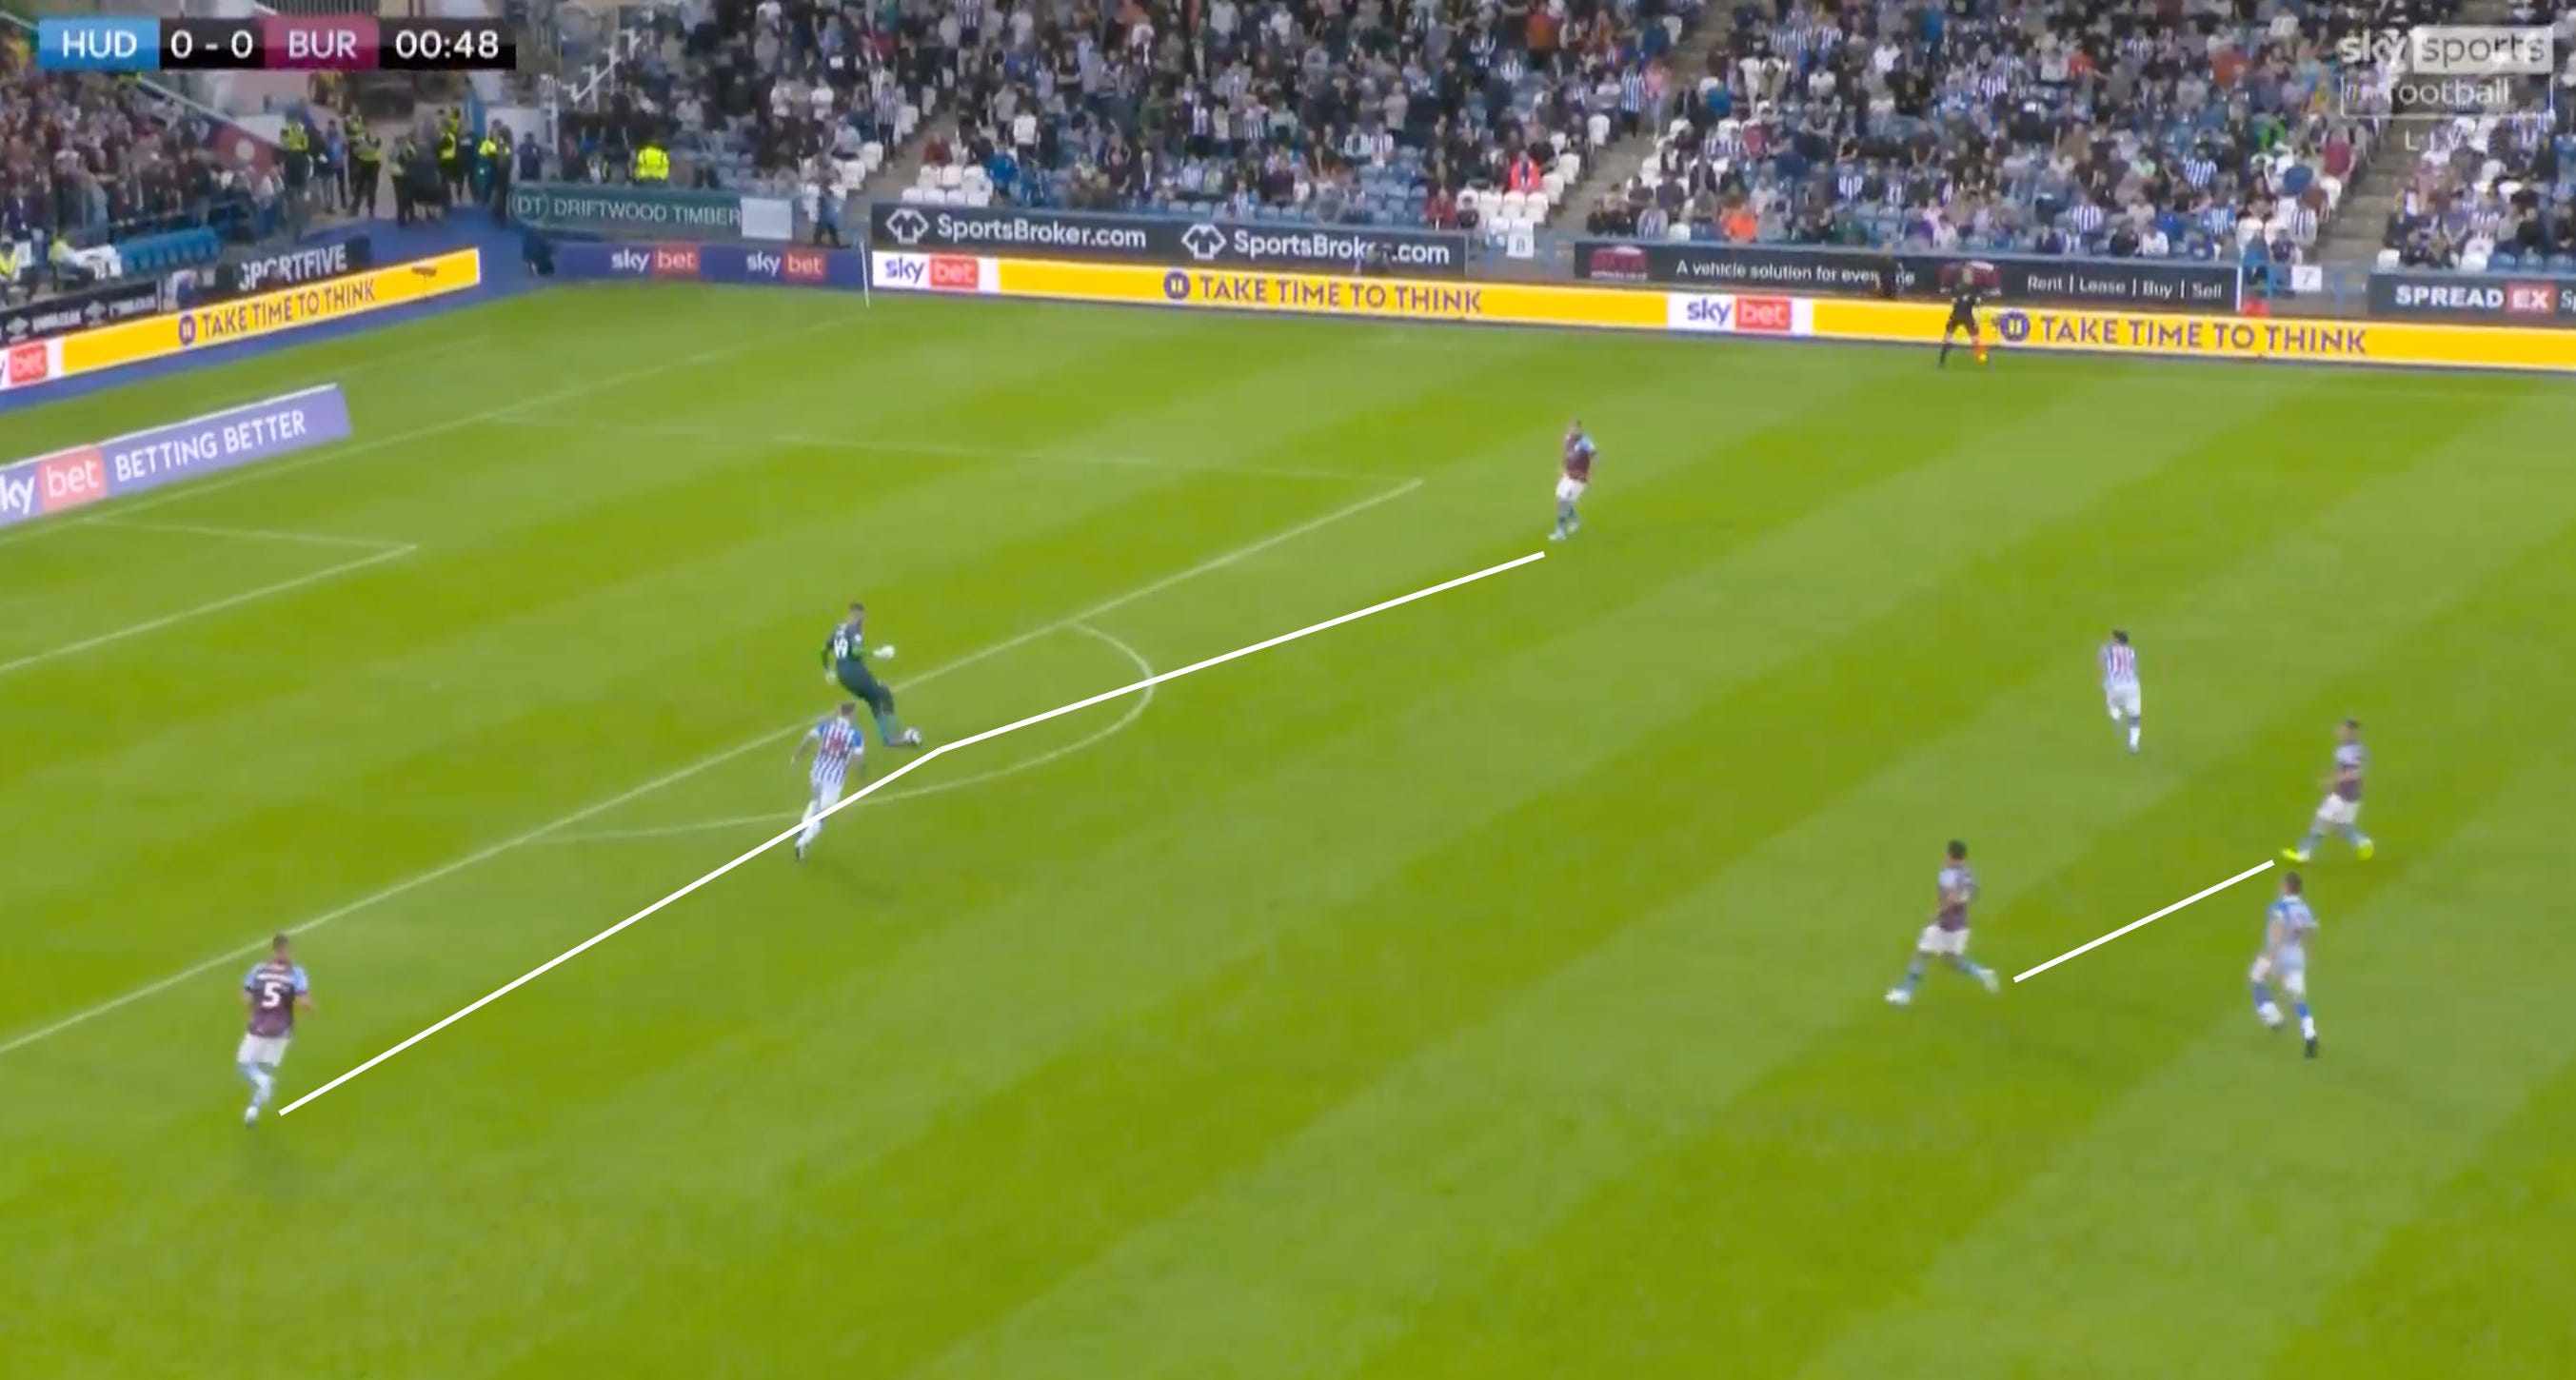

An important aspect of Burnley’s possession was maintaining close distance between the 3-2 lines and resetting if needed to restart the build-up. As Pep Guardiola often says, if the build-up isn’t clean, attacks generally aren’t clean. Kompany seems to have taken on this view to some extent.
If Burnley had possession in the middle 3rd but saw no immediate progression options, they were more than happy to go backwards to the GK or CBs to reset the 3-2 shape deep in their own half. Again, the aim was to attract pressure to create space behind Huddersfield’s front 4.
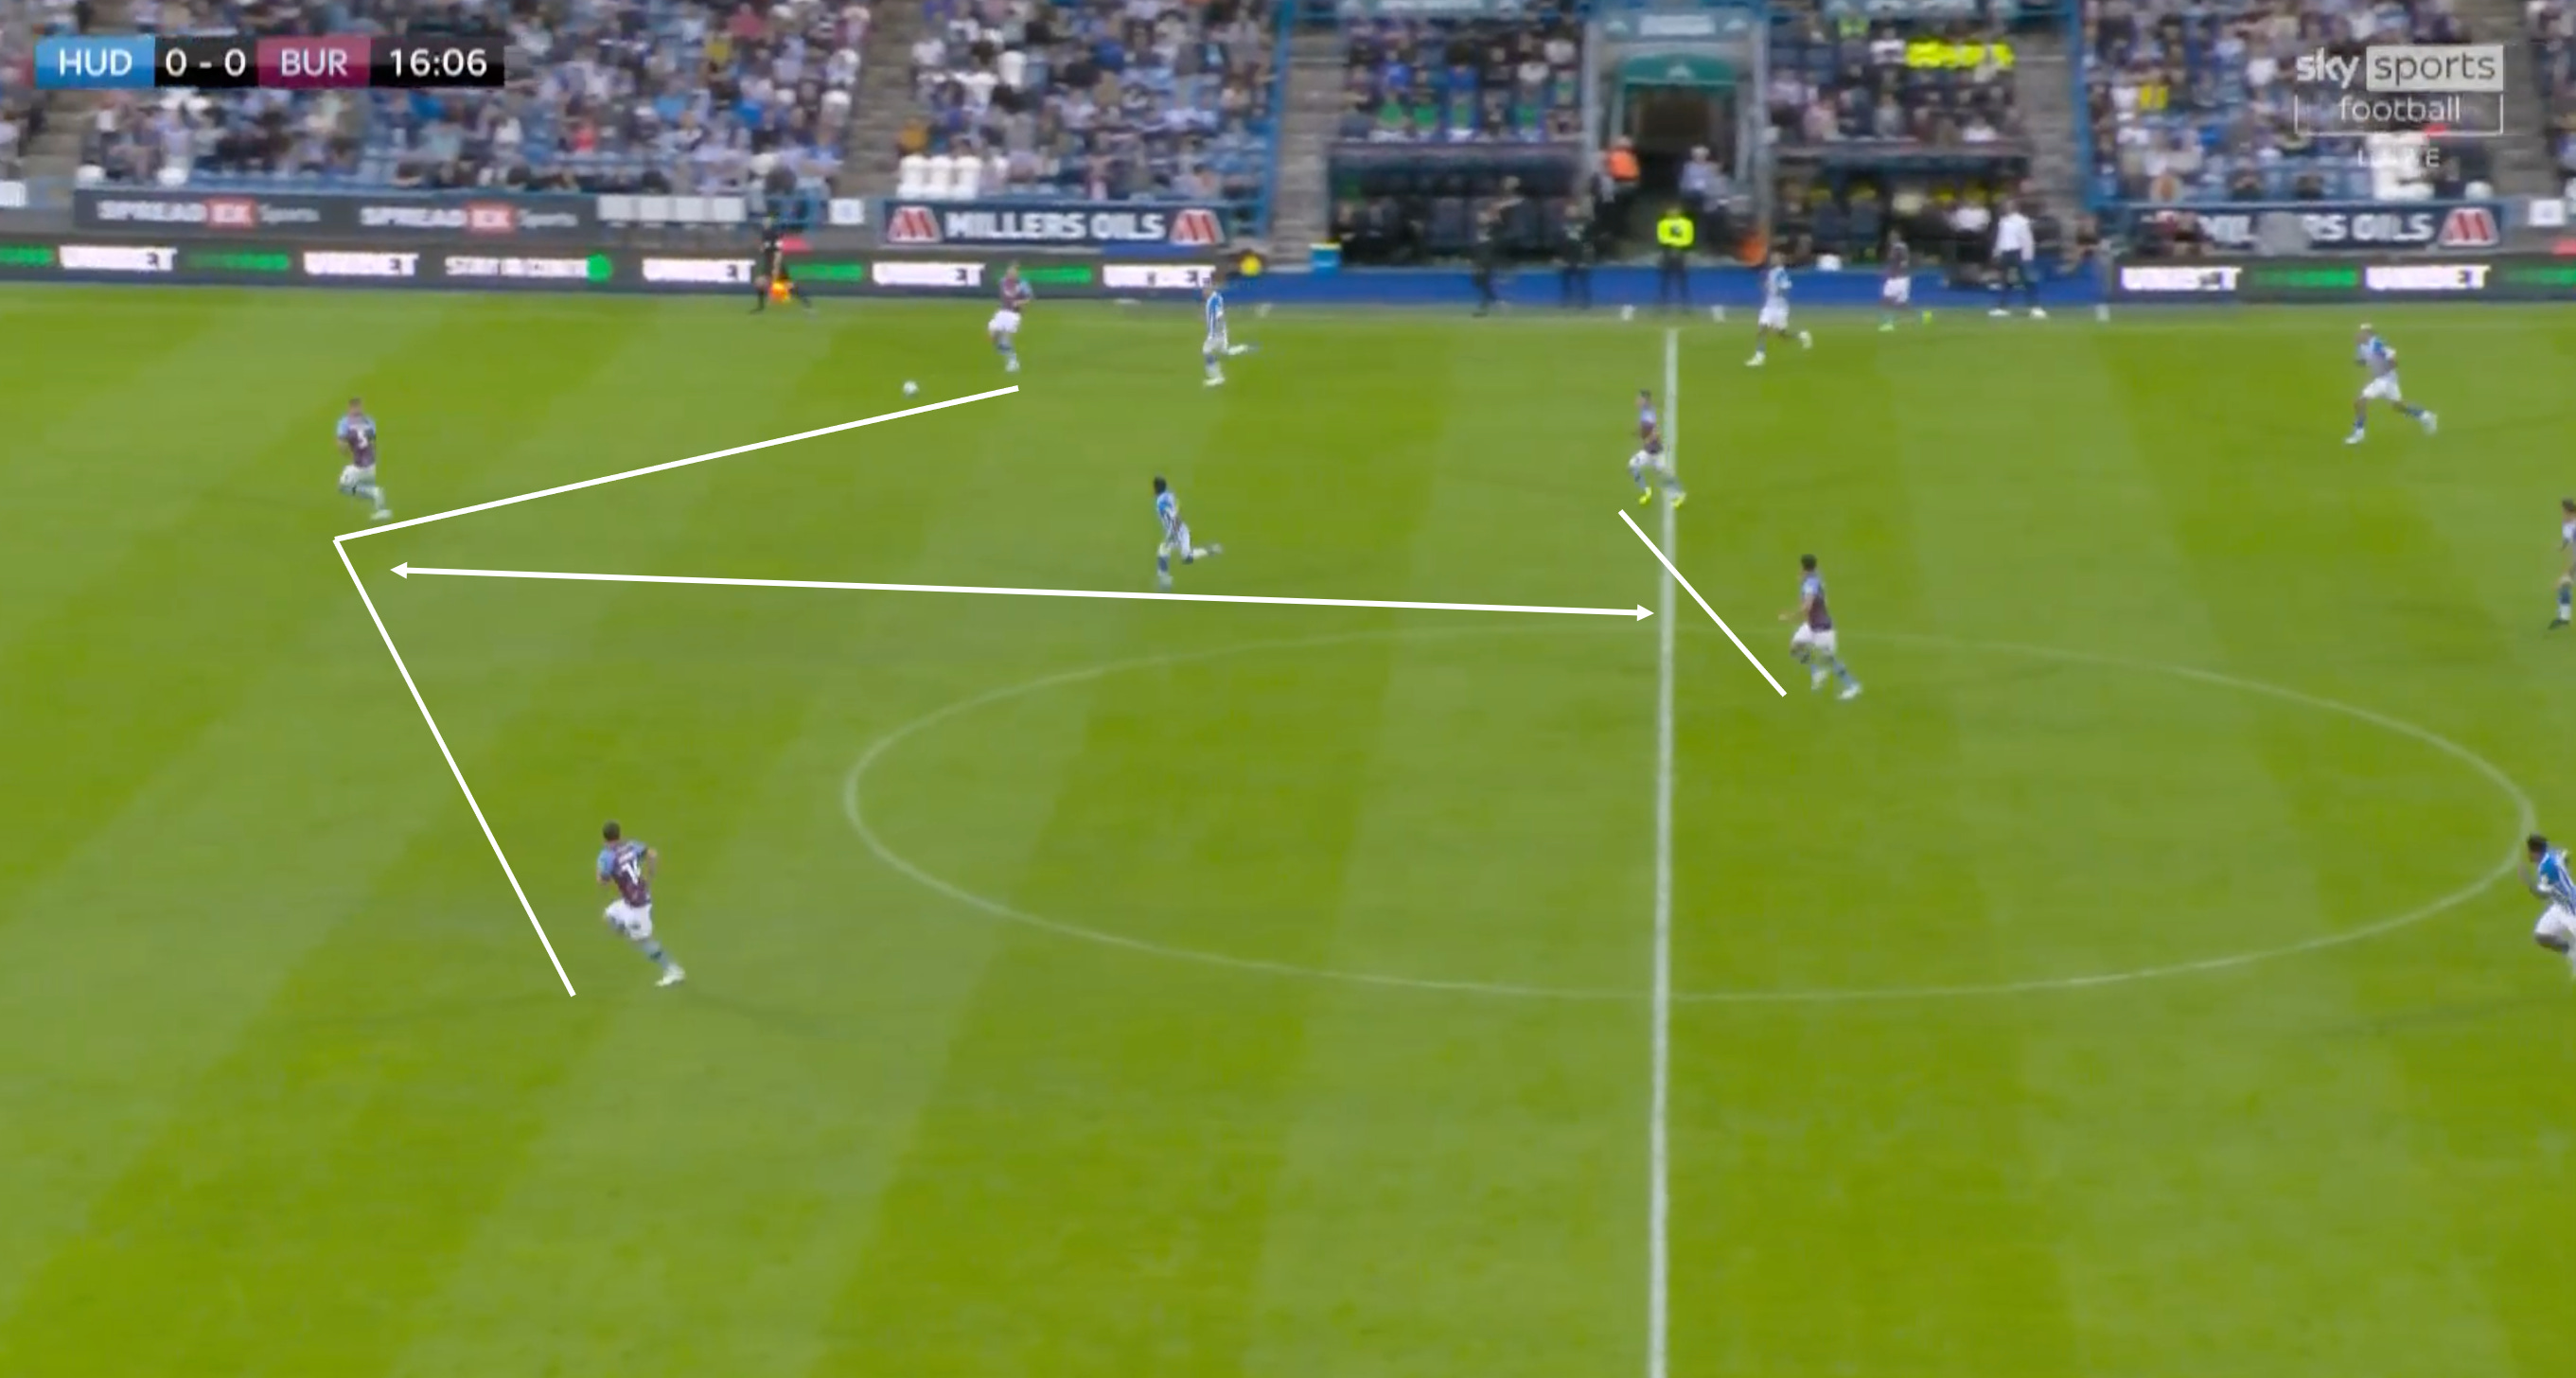
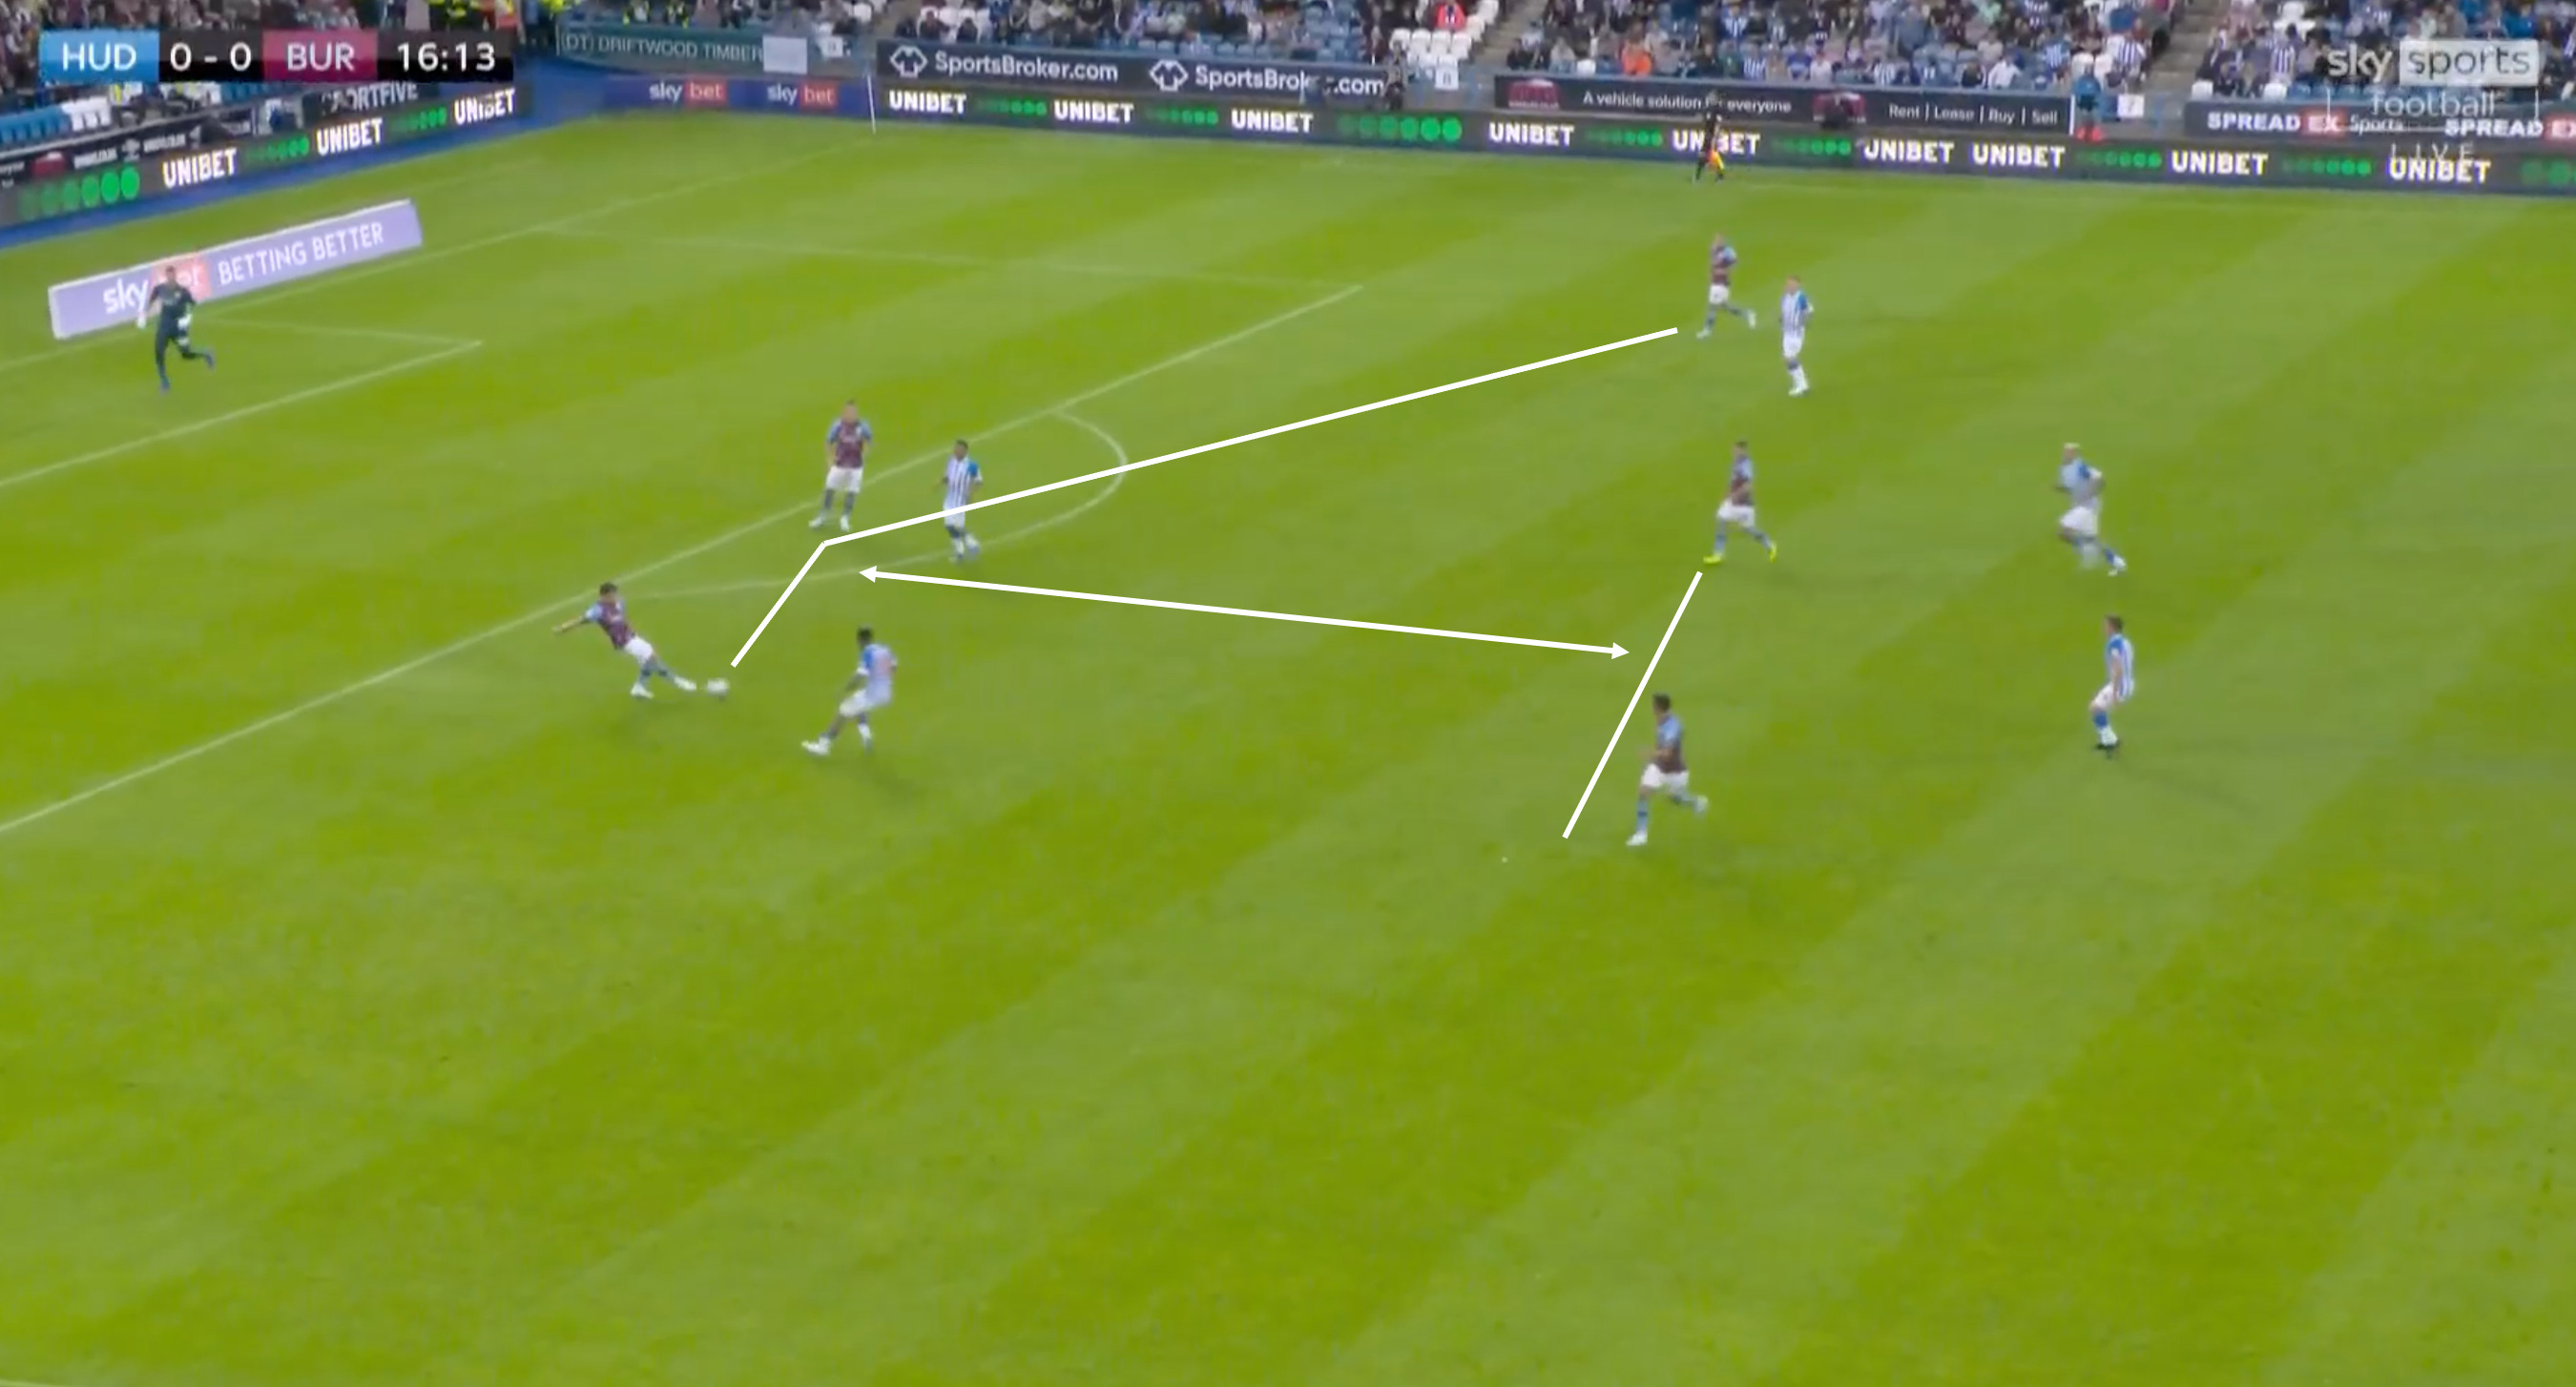
Again below we see Muric within the back 3, and both midfielders sprint towards the ball to attract the pressure of the Huddersfield midfielders. Muric is fairly skilled in clipping balls into the middle 3rd space created by these actions.

So Burnley’s first phase was clear.
A narrow 3-2 shape with little interest in playing wide or long initially. A clear emphasis on short distances and thus short passes, which invite pressure and create space to play through.
The key to this was the numerical overload that Burnley tended to have, and the patience with which they played. Technical security was also required which is why new recruits like Harwood-Bellis, Cullen and Muric are so important. It’s a high risk, high reward approach but the risk is mitigated by recruiting technically secure players.
2. Progressing the ball into the next line.
As discussed earlier, Burnley’s shape in-possession was a 3-6-1 box, with the most important point here being the “box”. As seen, Cullen and Cork make up the “2” in the 3-2 build up, but Brownhill and Bastien were crucial in helping to progress the ball. Brownhill and Bastien stayed central and relatively high in the build-up to overload Huddersfield’s midfield and receive between the lines.
It’s useful to imagine Burnley’s shape as 3-2-2 here as a central core.
The “3-2” build up, as well as Bastien and Brownhill as the “2” in the higher line. These 7 players, in central areas, essentially built through Huddersfield’s shape with different lines of depth to make them difficult to press effectively.
Maatsen (LW) and Costelloe (RW) offered extreme width but this was more a positional ploy to give Huddersfield’s wingers an issue rather than contributing to progressions - should the wingers cover the outside (Maatsen and Costelloe) or should they cover the inside (Bastien and Brownhill)? This was a numerical and positional overload created by Kompany’s system and the Terriers didn’t really have an answer.
Below are examples of how Burnley progressed playing from the 3-2 into the next line.

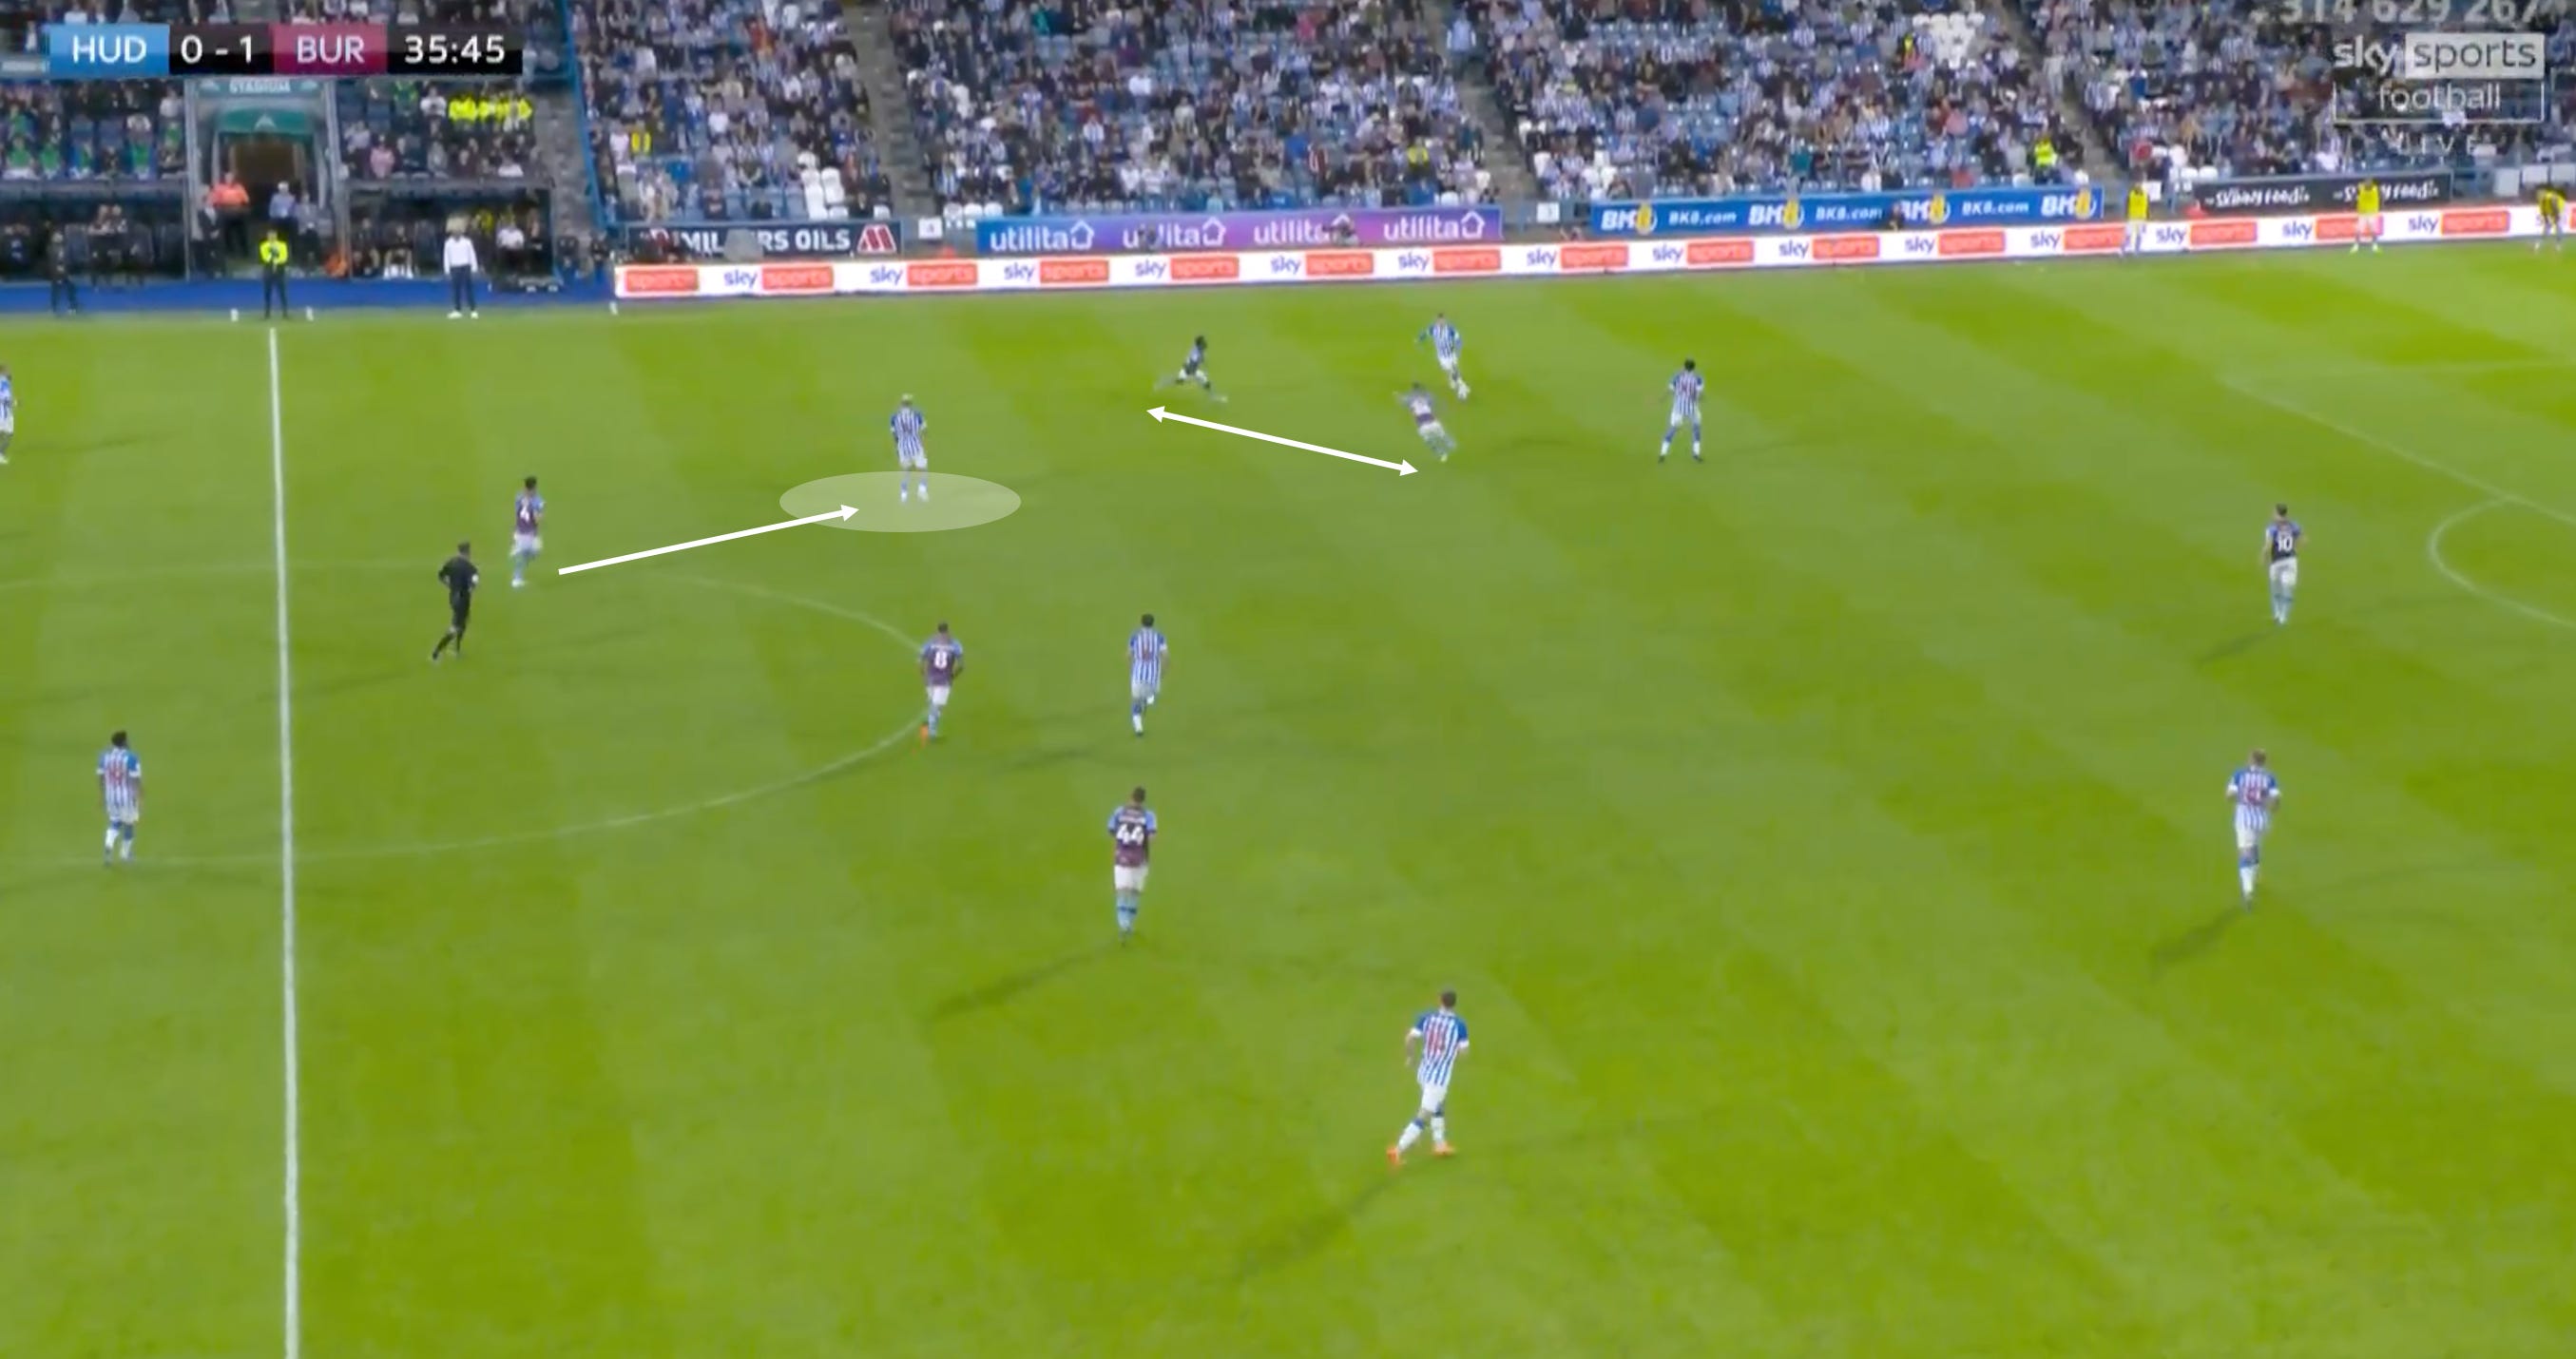
Good example below of a common pattern. Huddersfield’s front 6 are not particularly compact, and Burnley can play through this easily with the overload. The 3-2-2 distances are short and thus they can play through each line with short passes which are by nature more efficient and clean than playing longer.

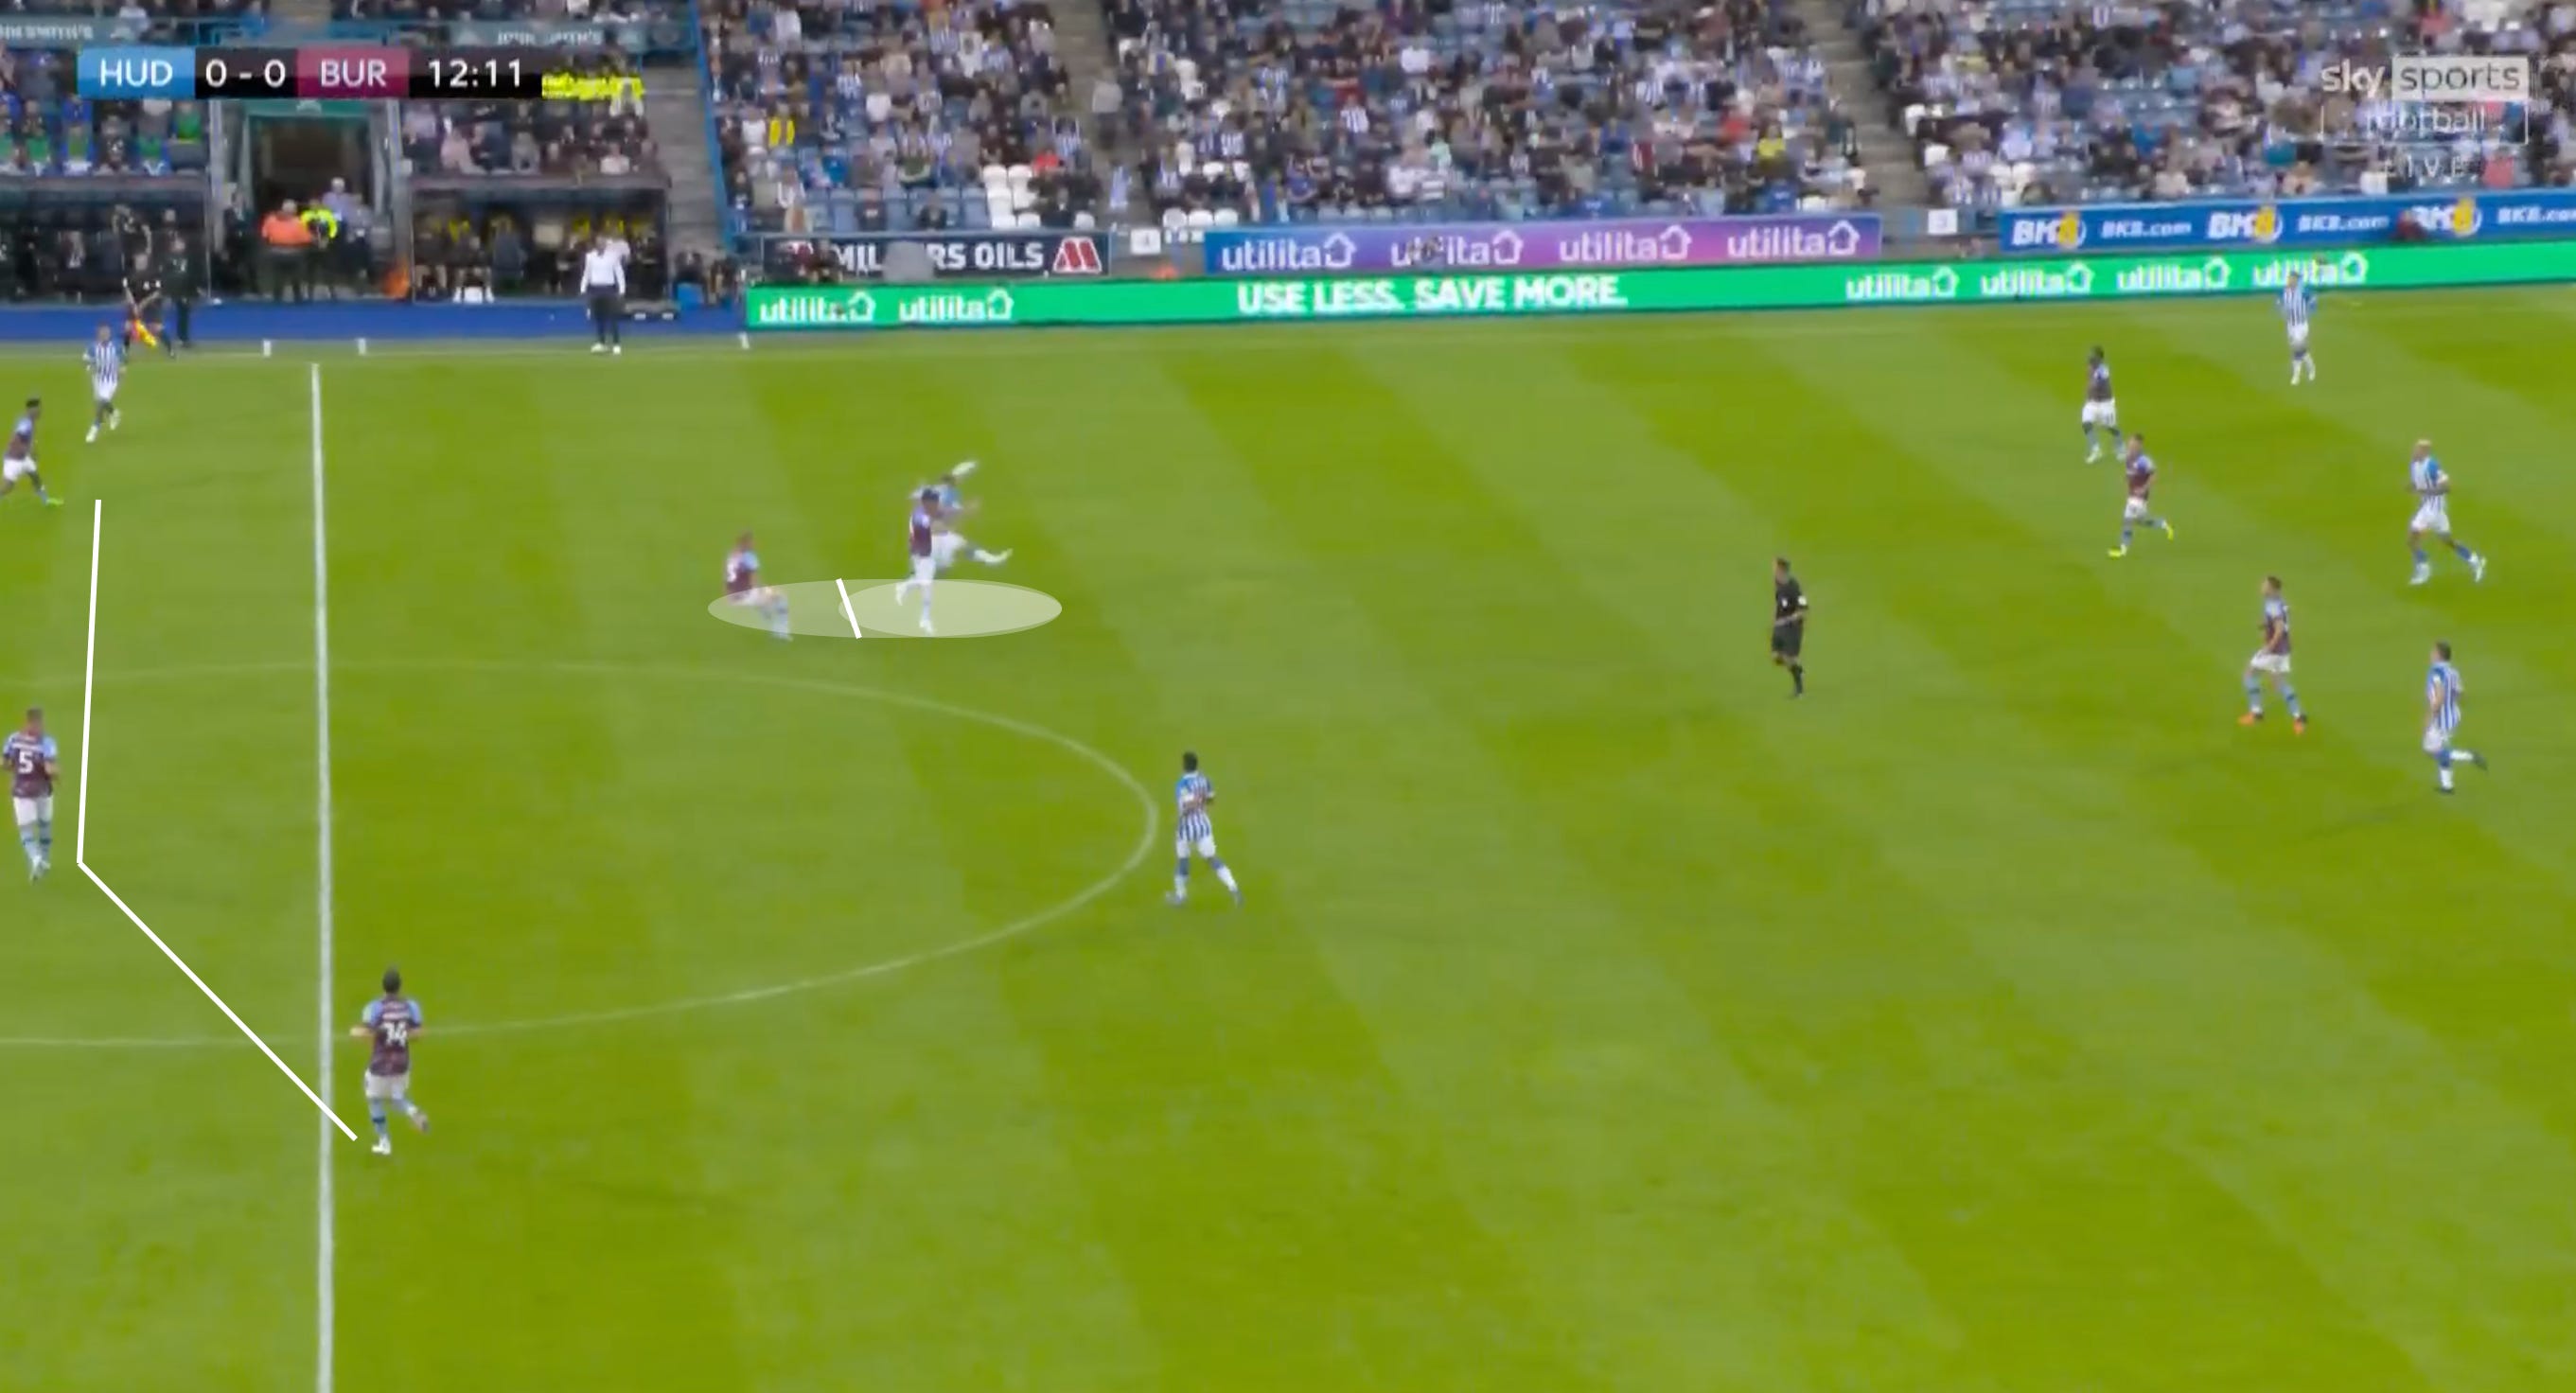
Below is an example of how Burnley’s extreme width (Maatsen, LW here) caused yet more problems for Huddersfield. We see the box 4 overloading central areas, but note how Maatsen holds width to give Huddersfield’s RW (Thomas) the dilemma of whether to engage outside to stop Maatsen, or to tuck inside and stop Bastien. Either way, he was going to open the passing lane into 1 Burnley play.
Again, this was a common theme and using 2 players in different horizontal lanes is a good way of overloading a player. Burnley play through to Bastien between the lines.

Again we see Maatsen providing maximum width which creates the gate for Burnley to play through to find Bastien between the lines. Interesting to note here than orthodox LB, Charlie Taylor, was used in the LCB role but he essentially took up LB positions on the left on the back 3 in the build up. This helped with progressions.
As I said, Huddersfield didn’t really have an answer to this. This is a good example of using wide players as placeholders to create the space for infield players to receive.

Below is an excellent example of the box midfield completely overloading Huddersfield’s midfield. If found, they have direct access to the back 4.

3. Penetrative movement.
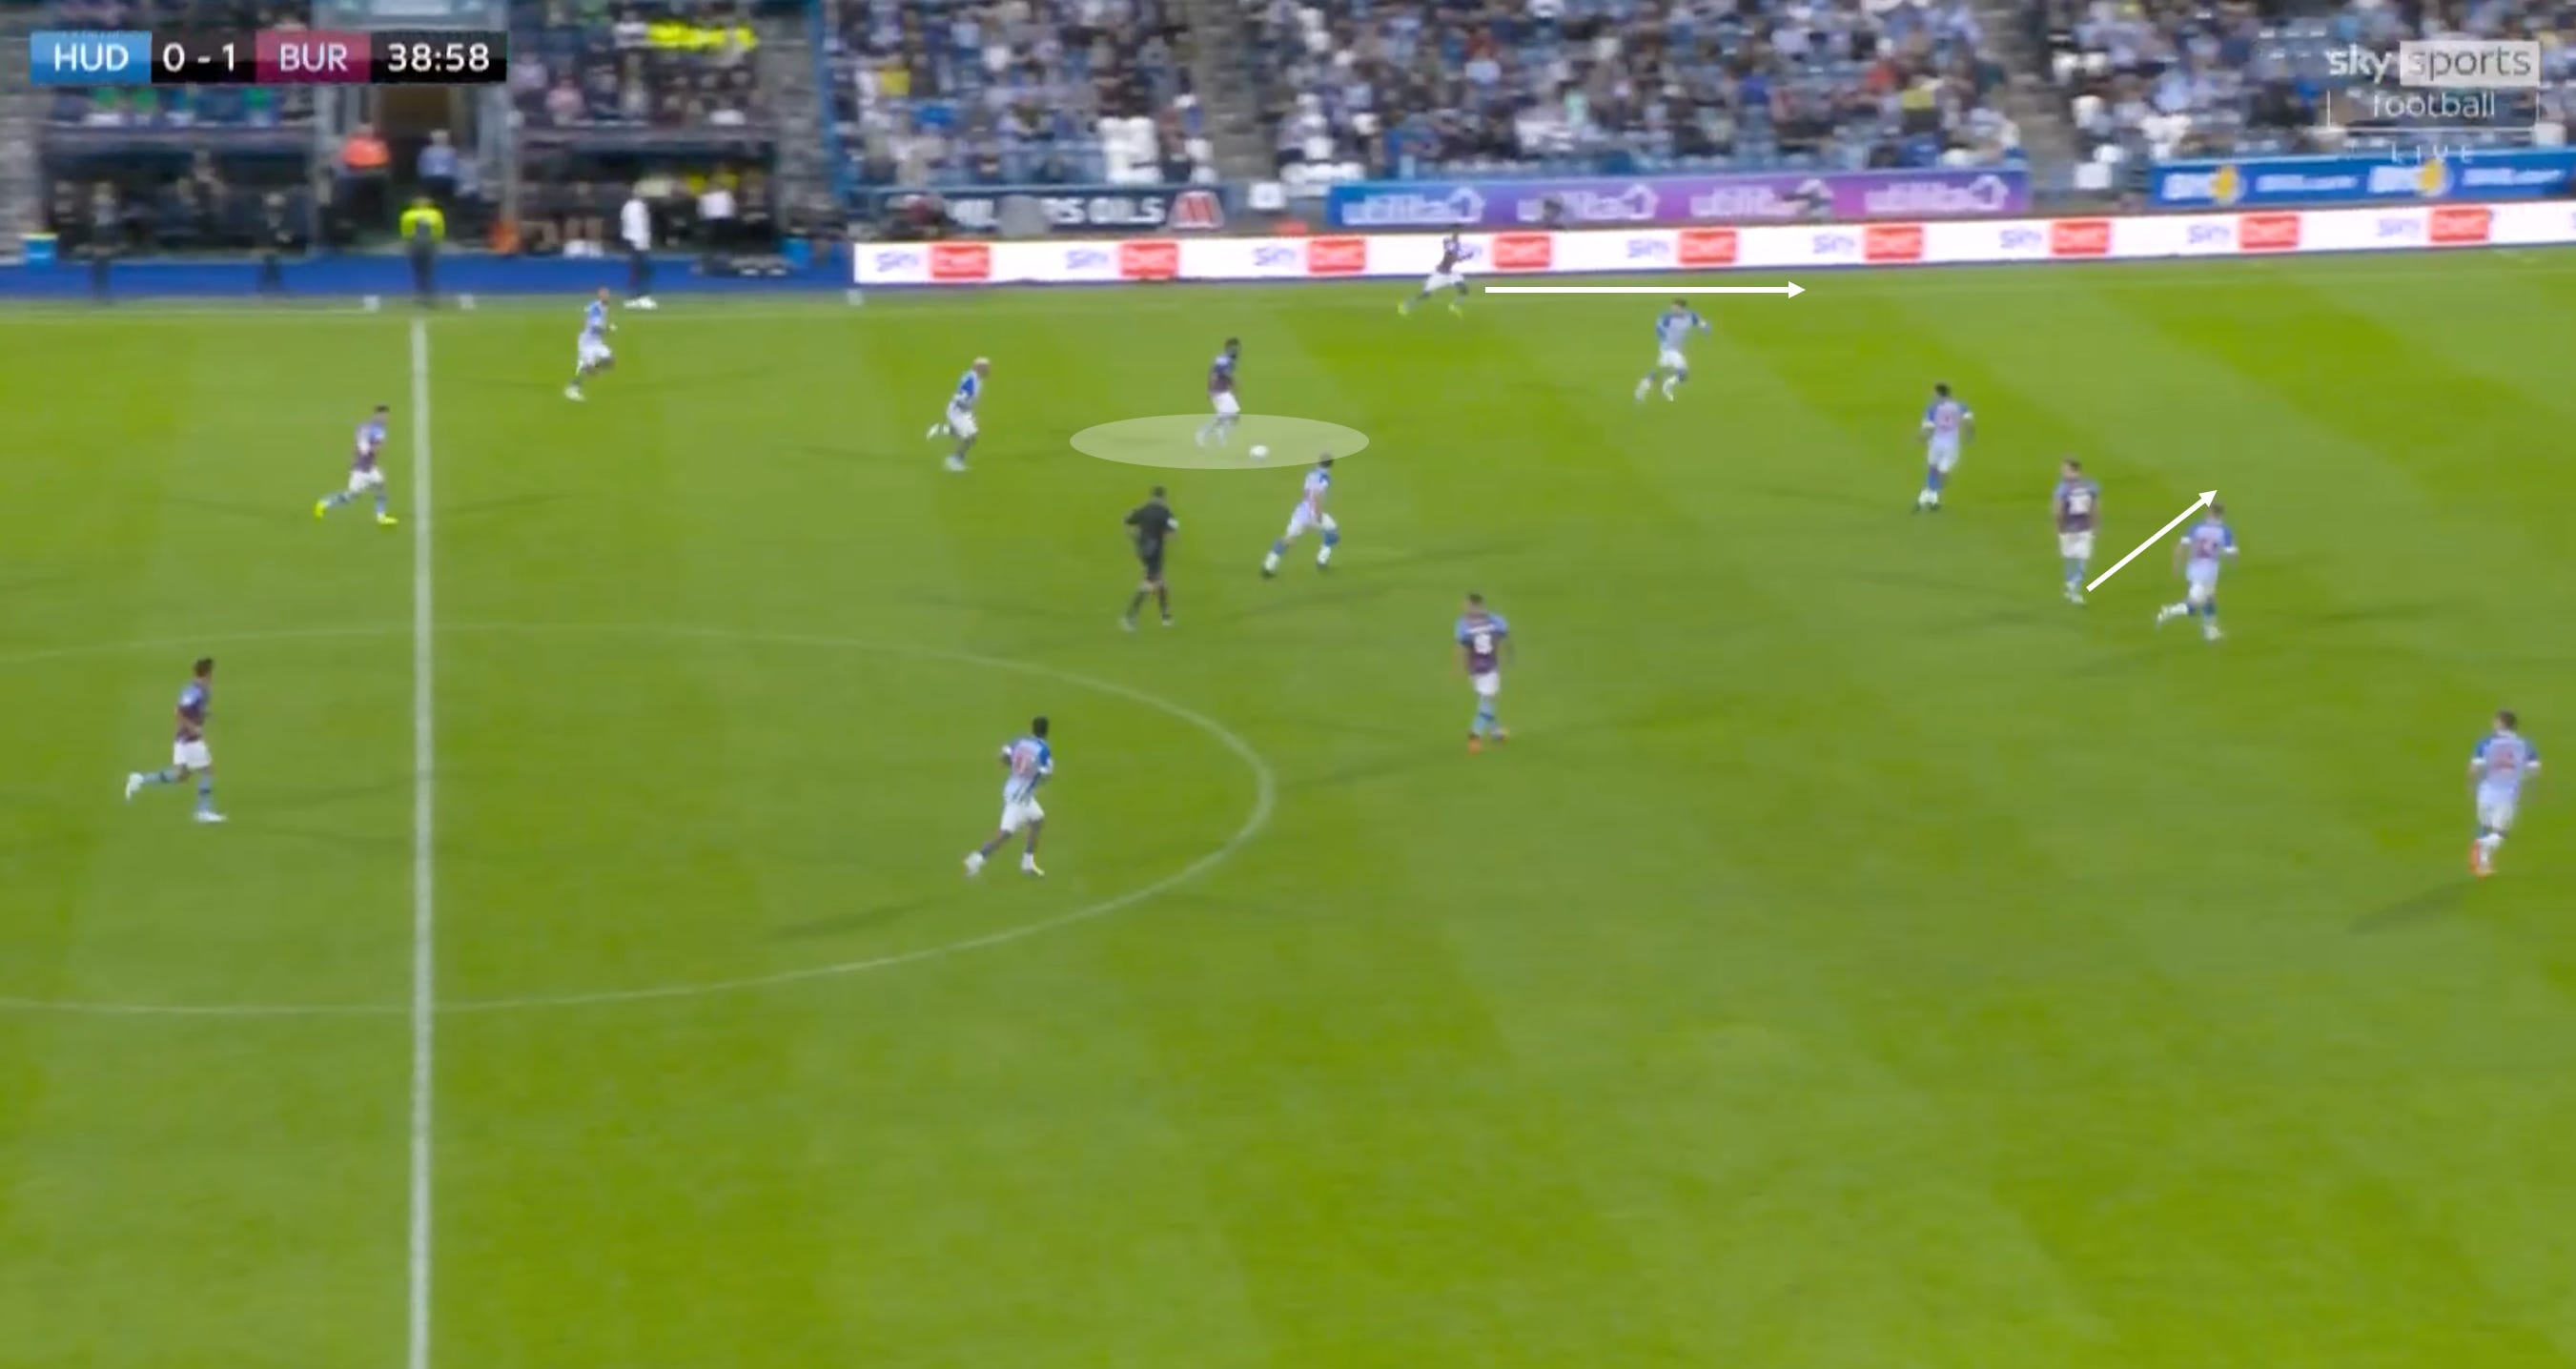
Once progressed into the middle 3rd, Burnley became extremely direct with midfield runners or wide players penetrating through Huddersfield’s defensive line.
Due to the build-up as discussed, once Burnley progressed the ball into the midfield, they were essentially attacking Huddersfield’s Back 4, because the front 6 were completely bypassed during the initial phase.
As soon as a Burnley player received facing forward between the lines, this acted as an instant trigger for the front line players to sprint into the space beyond the defence. This was clearly well rehearsed - the possession went from very slow and controlled to extremely direct.
After playing forward passes into the space, Burnley committed bodies into the final 3rd and attacked the box with full intent.


We see the same below when Bastien receives between the lines.

Below is another good example of progressing quickly once into the middle 3rd. Josh Brownhill, who will be one of the most impressive midfielders in the League this seasons, receives, turns and carries into space to progress play with speed.


As well as receiving between the lines due to an organised build-up, Burnley were also efficient in picking up loose balls and then penetrating instantly in what were genuine transition scenarios. Costelloe particularly was effective in picking up loose balls and playing forward quickly.


Burnley’s #9 Ashley Barnes has been used as a battering ram for a number of years but his role was more nuanced on Friday. He received very few direct balls into his chest/head and was instead tasked with timing movements beyond the defensive line.
He mistimed a fair few of these movement, but he clearly has developed a level of tactical nous over the years and used good spatial recognition to fashion chances, despite lacking much speed.
I predict that Kompany will look for another, more natural penetrative #9 at some point though, as Burnley’s build up here lent itself to a striker who excels in attacking space and finishing 1v1.


Again when space is created to play forward in the middle 3rd Barnes is immediately side on ready to penetrate. Cullen, excellent on debut, finds space and hits a large area with ease due to the poor pressure on him and the poor covering by Huddersfield defenders.


Again Burnley unpick Huddersfield’s initial pressure and the forward players burst into the space behind the defensive line.

The same happens again 5 minutes later. Huddersfield’s defenders didn’t really have an answer to this and the pressure ahead of them was so badly coordinated.

If Burnley’s initial phase built up higher than normal, around half way, Josh Brownhill moved right up onto Huddersfield’s defensive line and used dummy movement to create space for Barnes, in almost a #9 #10 parternship. Brownhill has developed exceptionally well tactically and physically over the years.

We see the same pattern later in the half. Brownhill occupies the space above the LCB and recognises to curve his run into a channel of wider space to draw the LCB out and create the passing lane into Barnes as the #9. I suspect this is something we will see more of when Burnley face deeper blocks.


4. Pressing.
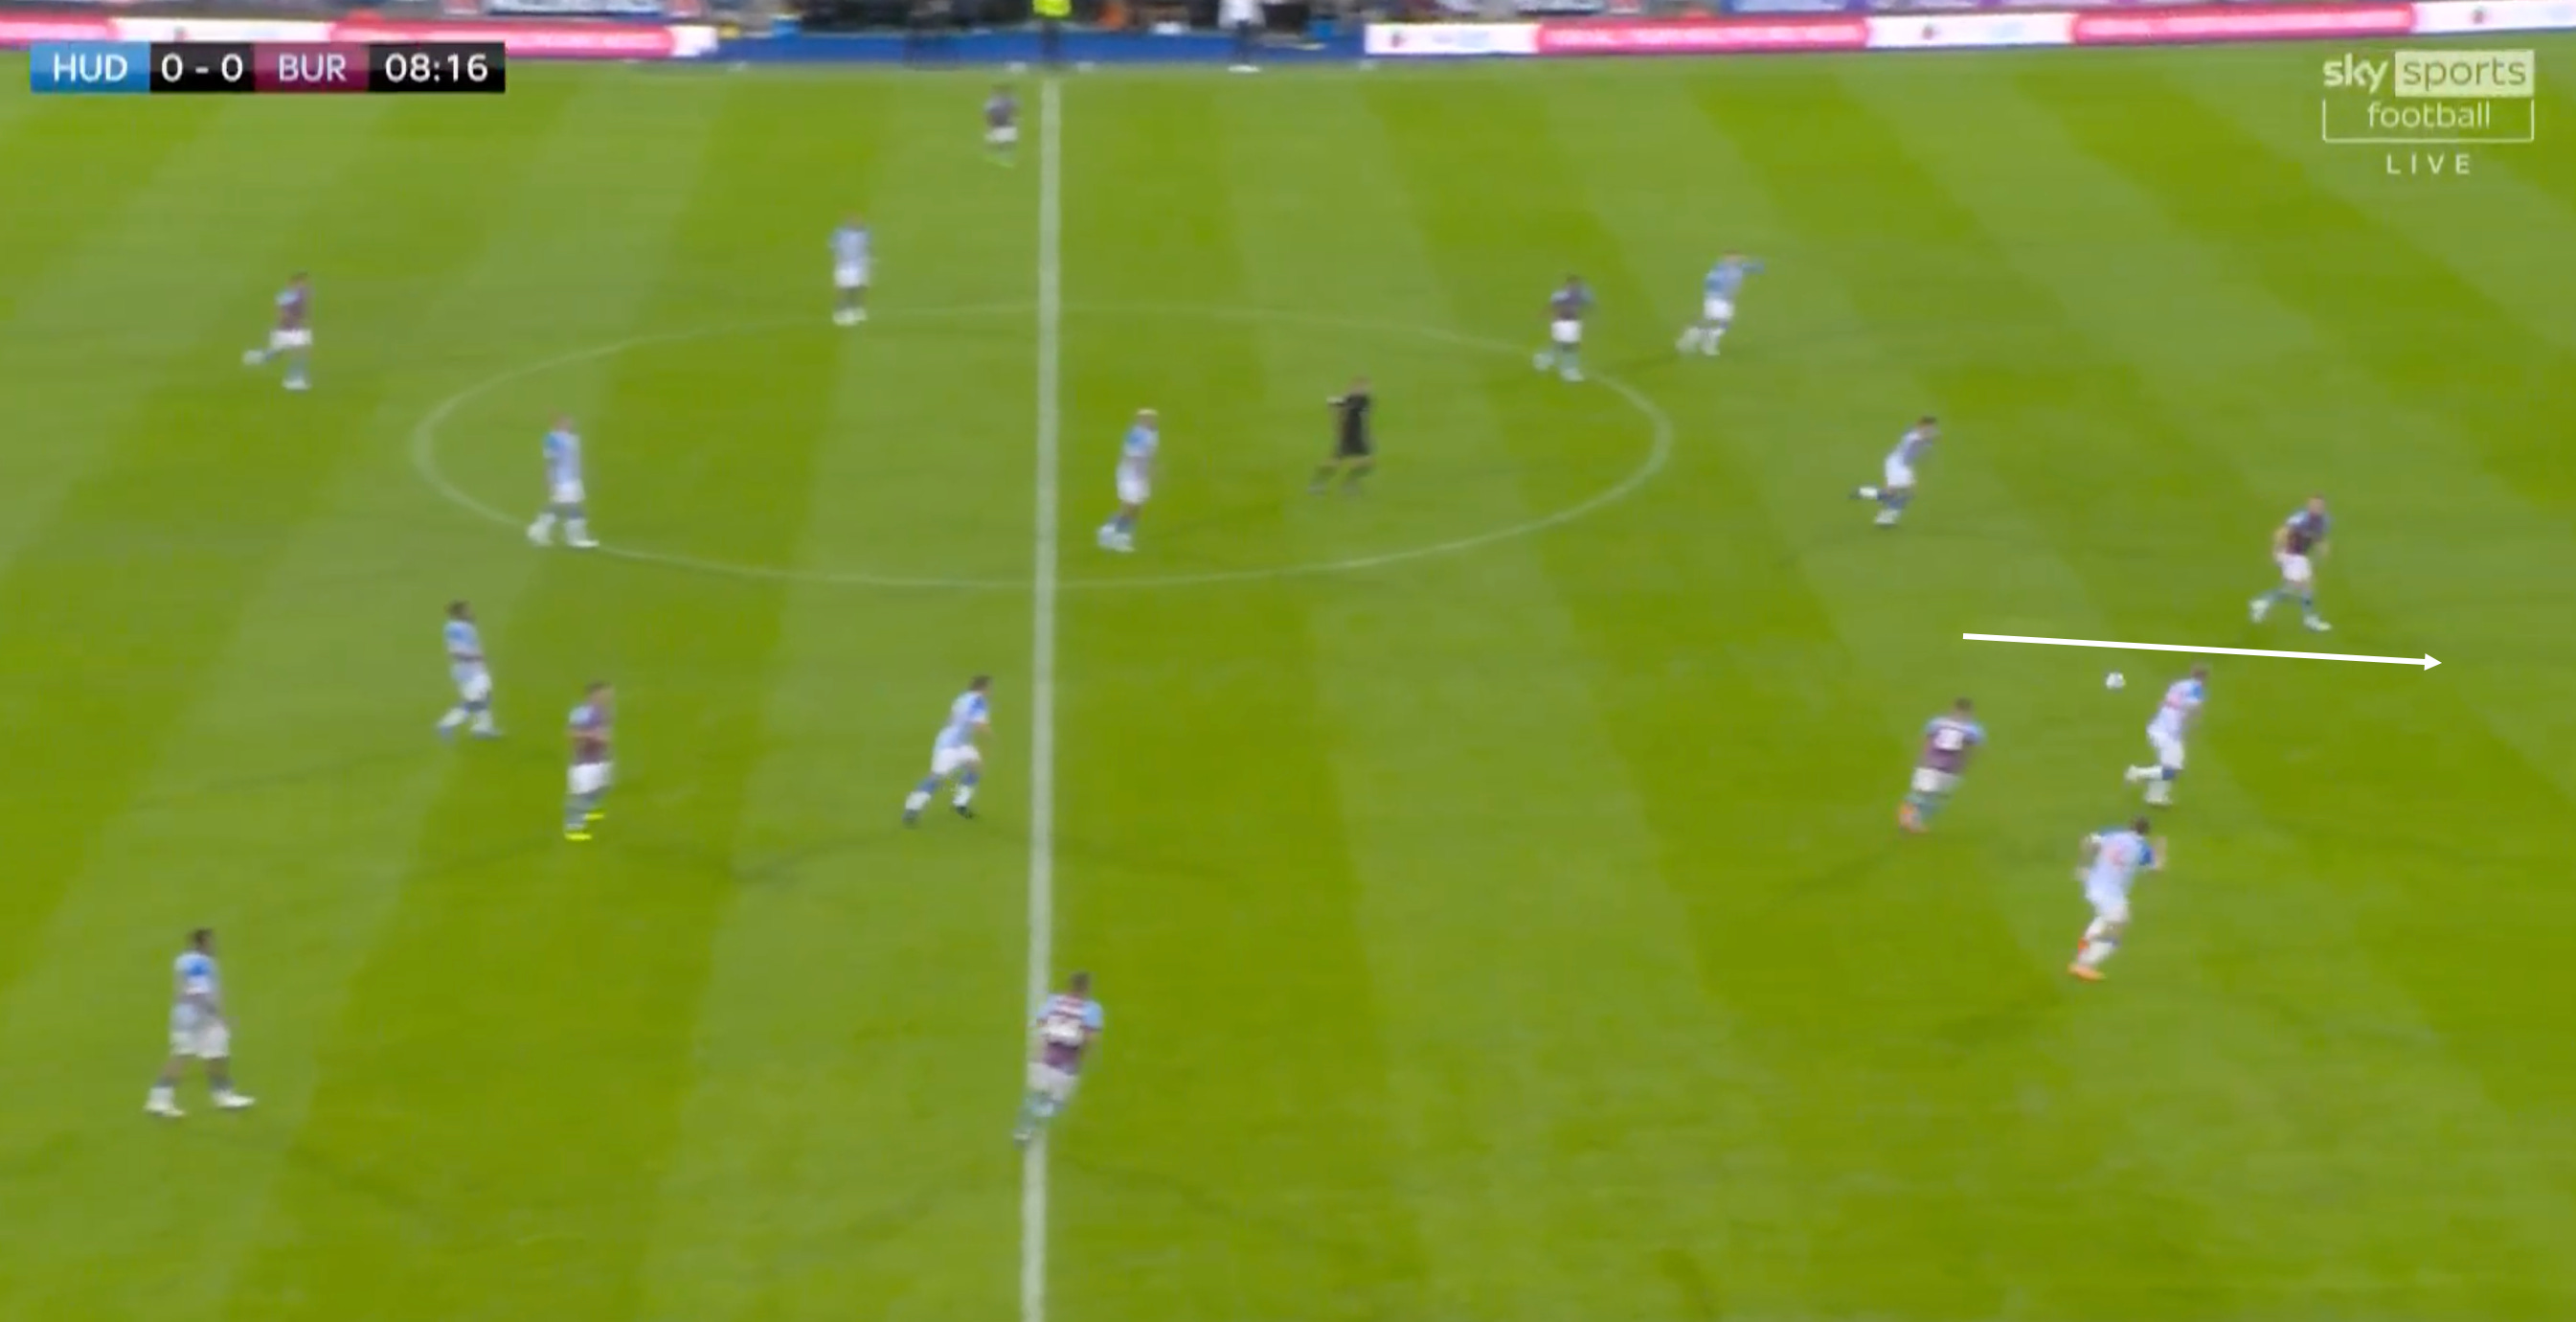
Burnley had the lion’s share of possession but they also focussed on regaining it quickly upon turnovers. There was impressive counter pressing and also well coordinated pressure from their 4-1-4-1.
Burnley would settle into a 4-1-4-1 shape if Huddersfield controlled the ball for a few seconds with emphasis on being relatively narrow and blocking central passing lanes. From the 4-1-4-1 the ball near player would burst out of the line and press the ball player, whilst blocking any potential passing option behind him. Jack Cork was key to this, acting as the pivot, as he would cover the space left by the player who burst out of the line to pressure the opponent.
As below, narrow 4-1-4-1 with the ball near playing leaving the shape to press the opponent with the intention of forcing backwards. Backwards passes would trigger Burnley to squeeze up the pitch with good intensity.
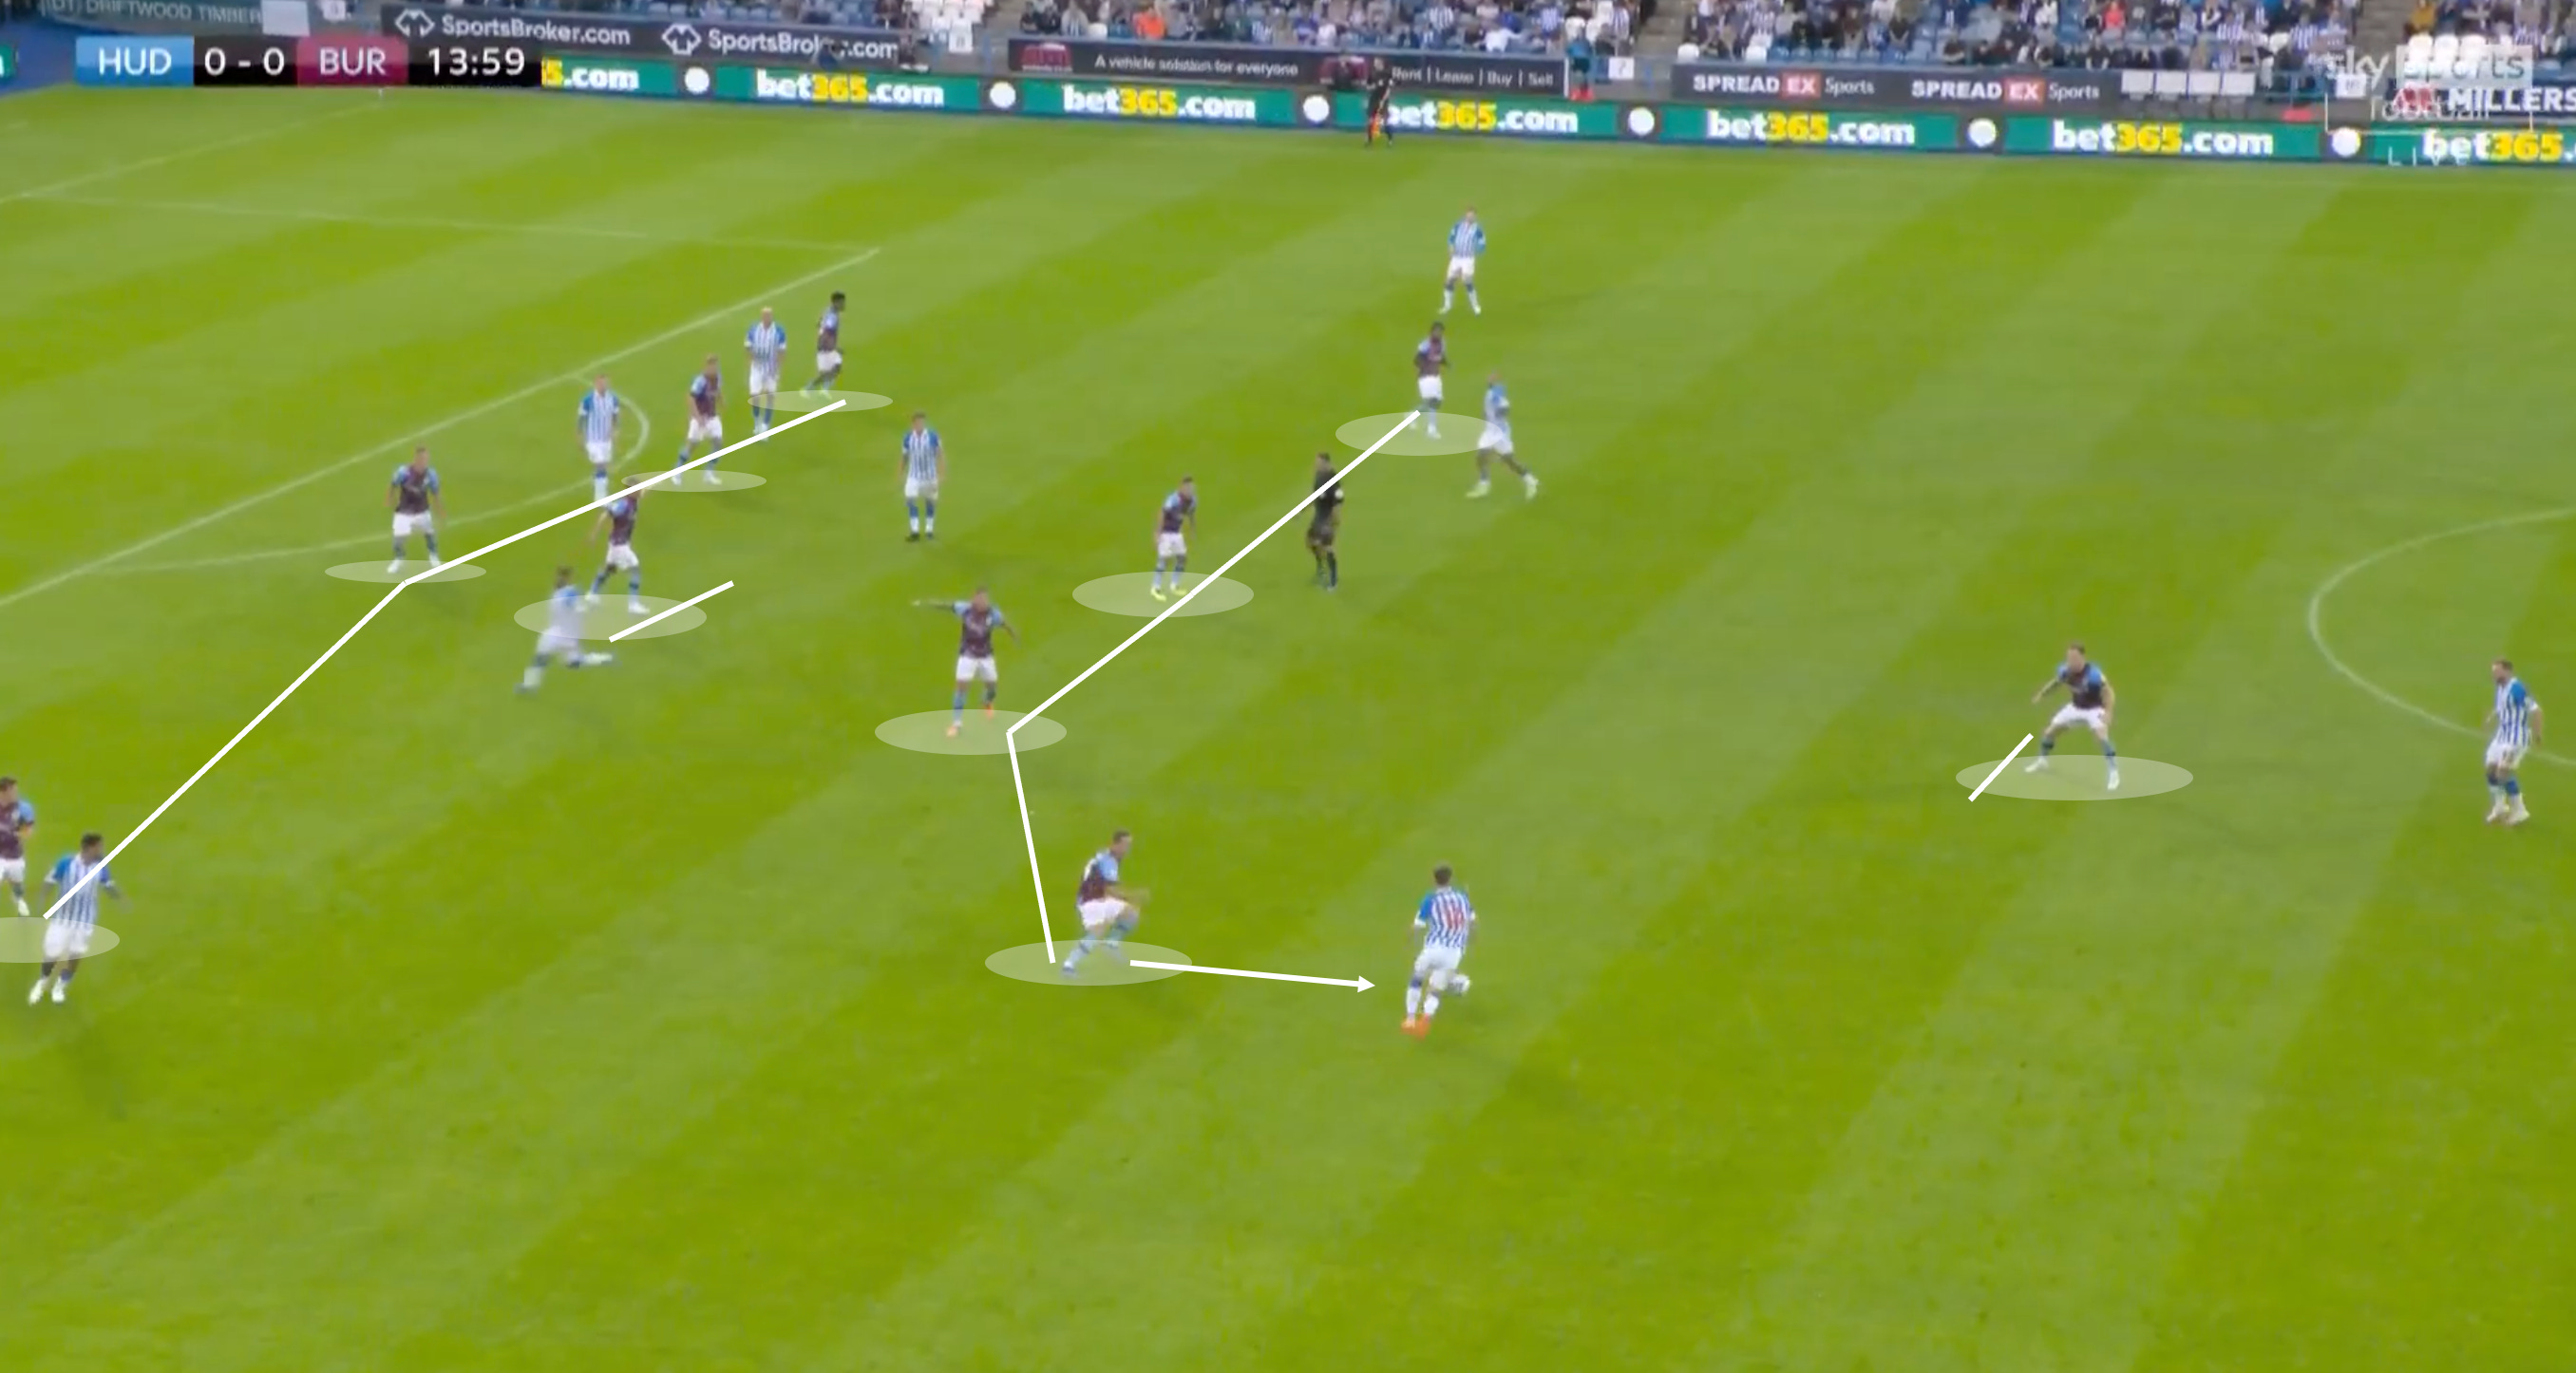
The ball is shifted and as the ball near player, Josh Cullen is tasked with leaving the line to apply pressure. The aim here is to press but also to cover the space he vacates by pressing at an angle that blocks the central passing lane. This requires good awareness and also speed and agility to readjust the angle of pressure.

Cullen presses forward and blocks the lane behind him. Note Jack Cork, acting as the pivot, is alert to covering the space that Cullen vacates. This ball near pressing orientation worked effectively throughout and generally forced Huddersfield backwards.

Again we see the same 4-1-4-1 shape with Brownhill this time ready to burst out. The ball is played backwards and this triggers Burnley to squeeze up and apply pressure.
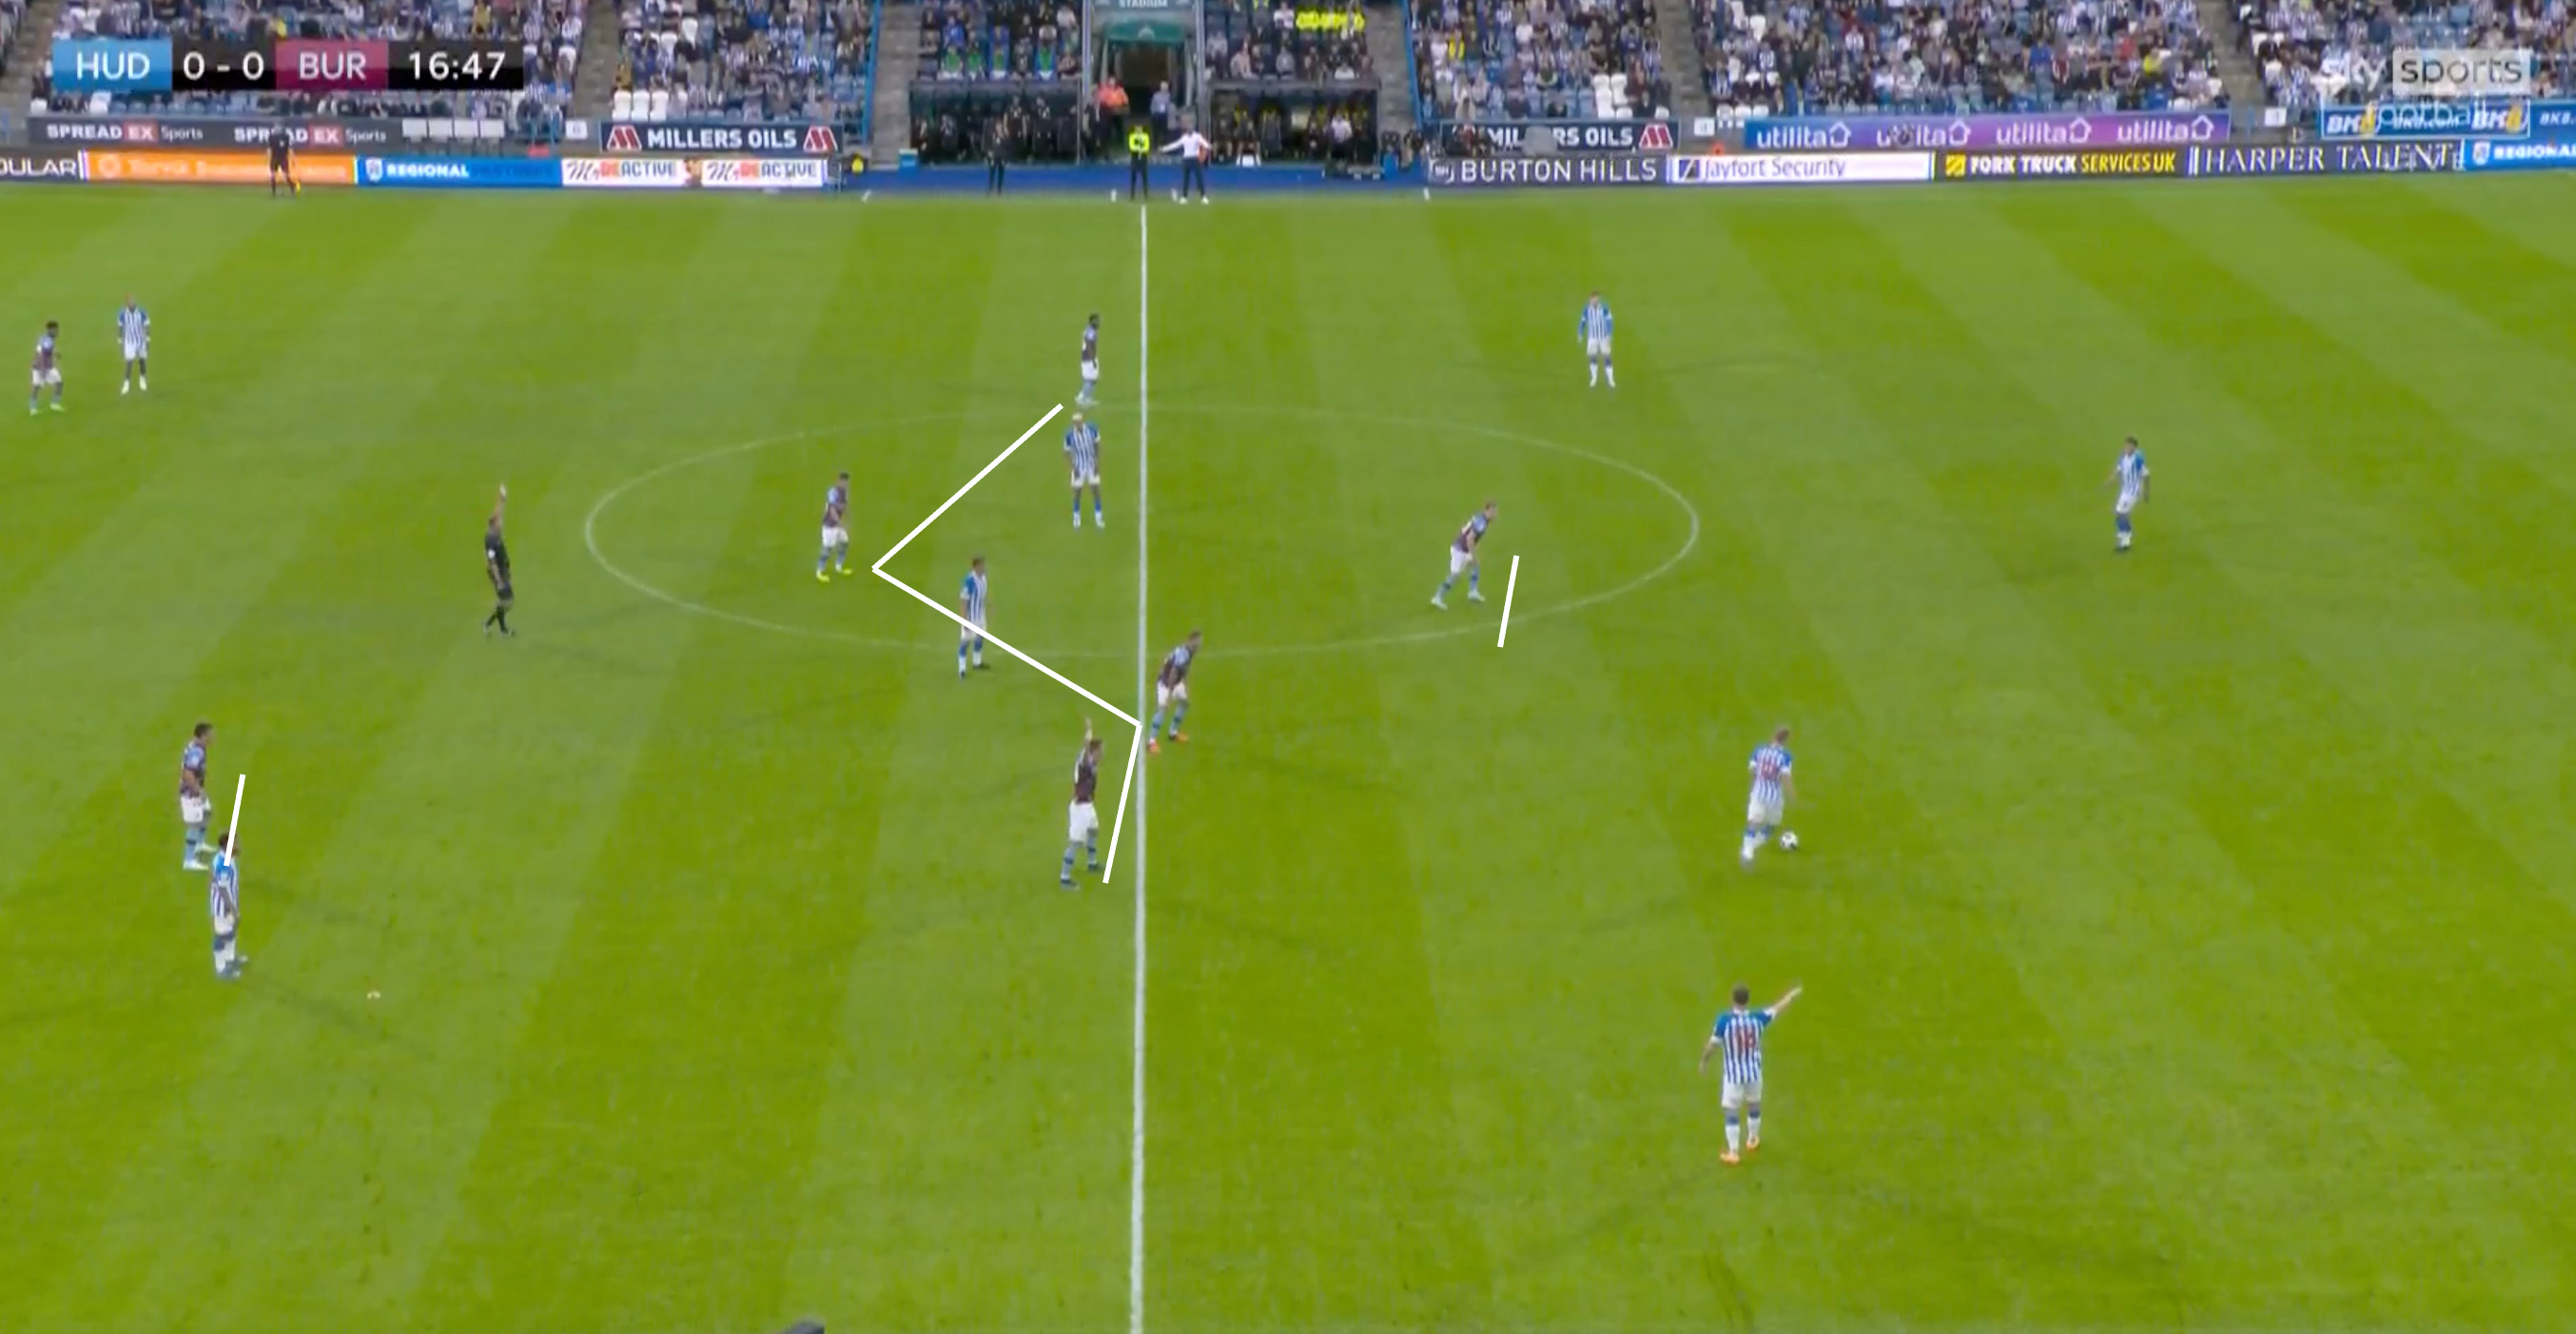
Burnley squeeze up and go man-to-man to force all the way back to the GK. Note Brownhill leaves his man in midfield and Cork will be tasked with winning any aerial duels if Huddersfield go over the pressure.

Again we see Cullen, as the ball near player, has left the line to press and Cork is aware to cover the space vacated if Huddersfield find a way through.


Below we see the perfect example of Burnley’s idea.
Set 4-1-4-1 shape.
Ball near player bursts forward to pressure the backwards pass.
Jack Cork as the pivot covers the vacated space and supports the press.


So, Cork was the key to supporting the press and plugging any gaps. He showed tactical maturity and good mobility to cover these large spaces.
Cork was also important when Burnley pressed from the front in a set shape to force Huddersfield long from goal kick scenarios.
Burnley used an asymmetrical system with RW (Costello) and ST (Barnes) pressing onto Huddersfield’s initial line of 3. Behind that Burnley went man-to-man and Huddersfield’s full backs and double pivot, using RB (Roberts) to press onto the LB. This allowed Costelloe to press onto the highest line.
This left Burnley slightly lopsided, with Bastien (LW) pressing the RB, and this allowed Maatsen (LB) to stay in a narrow back 3 line. Cork was tasked as the pivot was covering space and screening any long balls.

This is how the set up looks in practice. We see the RW (7) pushing up and the RB (2) covering onto the LB. This becomes a 3-1-4-2 shape again with the use of the wingers and full backs being different on both sides.
The key here is to force the ball from left to right, and to force it long.

This routine was excellent coaching and it was all about using positions to kill spaces at the right moments.
I won’t go into more detail than that as I don’t want to bore people, but this was a promising and very interesting start from Burnley under Kompany.
They will face much sterner tests than this disorganised Terriers side however Kompany’s tactical ideas will probably remain largely the same.
Overloading the build-up with +1.
Inviting pressure with deep, short passes.
Speeding up attacks once past the first line of pressure.
Penetrating space quickly.
Pressing from a shape to regain quickly (pivot key).